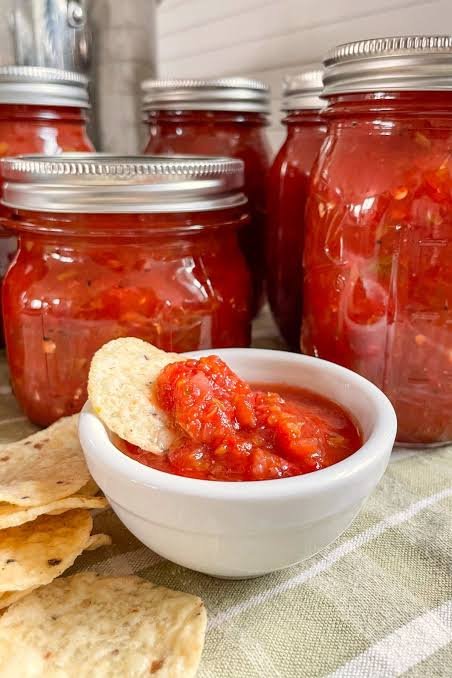
Canning salsa at home is one of the most rewarding kitchen projects you can ever start. This traditional preservation method lets you capture the peak flavor of garden fresh tomatoes and vibrant vegetables right when they are at their absolute best. When you make your own canned salsa, you control every single ingredient that goes into the jar. You do not have to worry about unwanted artificial preservatives, excessive sodium, or cheap additives that commercial brands often use to extend shelf life. Instead, you get a pure, bright, and delicious condiment that tastes infinitely better than anything you can buy at a local grocery store. Learning the step by step process of safe home canning gives you complete confidence in your kitchen skills. It allows you to transform a large harvest of fresh summer produce into beautiful, shelf stable jars that will keep your pantry fully stocked with rich flavor for many long months to come.
People all over the world absolutely adore homemade canned salsa because the taste is remarkably fresh, deep, and satisfying. Standard store bought versions often taste flat, overly cooked, or unpleasantly acidic, but homemade salsa retains the crisp balance of sweet tomatoes, sharp onions, zesty garlic, and warm peppers. There is a immense sense of pride that comes from popping open a sealed glass jar in the middle of cold winter and smelling the rich aroma of summer vegetables. Friends and family always appreciate receiving a fresh jar of homemade salsa as a thoughtful gift. It brings people together during family gatherings, casual movie nights, weekend tailgate parties, and festive celebrations. The versatile nature of this recipe means you can customize the heat level to suit your exact preference, making it a crowd pleasing favorite for every single person at your dining table.
There are so many wonderful reasons to make this recipe, whether you are focused on health, saving money, or creating joyful emotional memories. From a health and fitness standpoint, homemade salsa is a fantastic low calorie, high nutrient option that adds massive flavor to plain meals without adding unhealthy fats or heavy sugars. It is packed with natural vitamin C, antioxidant rich lycopene, and essential dietary fiber that support your overall wellness. Emotionally, the process of chopping fresh vegetables and listening to the rhythmic sound of canning jars sealing on your counter is deeply comforting and therapeutic. It connects you to traditional cooking methods and helps reduce food waste when your home garden produces more tomatoes than you can eat fresh. Making a large batch of salsa is a smart, economical choice that fills your heart with satisfaction and your pantry with wholesome food.
Ingredients You Will Need
-
8 cups fresh tomatoes, washed, peeled, cored, and finely chopped
-
2.5 cups yellow onions, peeled and finely diced
-
2 cups sweet green bell peppers, washed, cored, and finely diced
-
1 cup jalapeno peppers, washed, seeded, and finely chopped
-
6 cloves fresh garlic, peeled and minced
-
1 cup pure bottle lemon juice or lime juice
-
1 tablespoon coarse canning salt
-
1 tablespoon granulated white sugar
-
1 teaspoon ground cumin
-
1 teaspoon black pepper
-
0.5 cup fresh cilantro, washed and finely chopped
Step by Step Method
Preparing Your Equipment
Start by thoroughly washing your glass canning jars, metal lids, and screw bands in warm, soapy water. Rinse them completely to ensure no soap residue remains behind. Place your clean jars inside your large water bath canner and cover them completely with clean tap water. Bring the water to a gentle simmer over medium heat to keep the jars hot until you are ready to fill them. Keeping your glass jars hot prevents them from cracking when you pour hot salsa inside. Place your metal lids in a small pot of warm water over low heat to soften the rubber sealing rings. Prepare your cutting board, sharp knives, large stainless steel stockpot, and long wooden spoon so everything is organized and within easy reach before you begin cooking your ingredients.
Prepping the Tomatoes
Peeling your tomatoes is an essential step for achieving the absolute best texture in your canned salsa. Bring a large pot of plain water to a rolling boil on your stove top. Fill a separate large bowl with cold water and plenty of ice cubes to create an ice bath. Using a sharp knife, cut a small, light cross mark on the very bottom of each fresh tomato. Carefully drop four or five tomatoes at a time into the boiling water and leave them there for about thirty to sixty seconds. As soon as you see the skins start to crack open, remove the tomatoes with a slotted spoon and submerge them directly into the prepared ice bath. Once the tomatoes cool down, use your fingers to easily slip the skins right off. Core the peeled tomatoes, scoop out excess loose seeds if you prefer a thicker salsa, and chop the tomato flesh into uniform, small pieces.
Prepping the Vegetables
Safety is very important when handling hot peppers like jalapenos. Put on clean food safe disposable gloves before cutting your peppers to protect your skin from the spicy oils. Dice your yellow onions, green bell peppers, and jalapeno peppers into uniform, small pieces so every bite of salsa has an even mixture of texture and flavor. If you want a milder salsa, carefully remove and discard all the inner white ribs and seeds from the jalapenos. If you prefer a much spicier flavor profile, you can leave some of the seeds in the mix. Mince your fresh garlic cloves finely so the rich garlic flavor distributes evenly throughout the entire sauce. Wash your fresh cilantro under cool water, pat it dry completely with clean paper towels, and chop it finely.
Cooking the Salsa Mixture
In a massive stainless steel stockpot, combine your chopped peeled tomatoes, diced onions, diced green bell peppers, chopped jalapenos, and minced garlic. Pour in the measured bottle lemon juice or lime juice. It is vital to use commercially bottled juice rather than fresh squeezed juice because bottled juice has a standardized, guaranteed acidity level that ensures safe canning. Stir in the canning salt, white sugar, ground cumin, and black pepper. Place the pot over medium high heat and bring the entire vegetable mixture to a full boil, stirring frequently to prevent sticking. Once the salsa reaches a boil, lower the heat to medium low and let it simmer uncovered for twenty minutes, stirring occasionally so the flavors meld together perfectly. Stir in the fresh chopped cilantro during the last two minutes of simmering.
Filling the Jars
Carefully lift one hot glass jar out of your canner using a jar lifter tool, draining any excess water back into the pot. Place the hot jar on a clean wooden board or a folded kitchen towel to protect your countertop from temperature shocks. Place a wide mouth canning funnel into the top of the jar. Ladle the hot salsa into the jar, leaving a clear half inch of space between the top of the salsa and the top rim of the jar. This empty area is called headspace, and it is crucial for creating a proper vacuum seal. Insert a clean bubble remover tool or a flexible plastic spatula down into the jar along the inside edges to release any trapped air bubbles. Recheck your headspace and add or remove a small amount of salsa if necessary.
Cleaning the Rims and Securing Lids
Take a clean paper towel dampened with hot water and carefully wipe the very top rim and outer threads of the filled glass jar. Any tiny speck of salsa or drop of juice left on the glass rim can prevent the rubber gasket on the metal lid from sealing correctly. Place a warm metal lid directly onto the clean center of the jar rim. Screw the metal outer band over the lid until it is fingertip tight. Do not use full physical strength to wrench the band down as tight as possible, because air must be able to escape from inside the jar during the hot water bath processing phase. Repeat this entire filling, wiping, and capping process for all your remaining hot jars.
Processing in the Water Bath
Use your jar lifter to lower the filled, sealed jars straight down into the warm water bath canner. Ensure the jars sit upright and do not lean against each other. The water level inside the pot must cover the tops of the metal lids by at least one full inch. If the water level is too low, add more hot water to the pot immediately. Place the heavy lid on your canner and turn the stove burner up high to bring the water to a full, rolling boil. Once the water reaches a vigorous boil, start your timer for fifteen minutes. Maintain a steady boil for the entire fifteen minute processing duration. If your local area is located high above sea level, you must increase this processing time according to standard altitude adjustment guidelines.
Cooling and Testing Seals
When the processing time is complete, turn off your stove top burner entirely. Remove the big lid from the canner away from your face to avoid steam burns. Allow the jars to rest undisturbed inside the hot water for five minutes to settle down. Use your jar lifter to lift the jars straight out of the pot without tilting them, and place them onto a dry towel on your kitchen counter. Leave at least one inch of space between each jar so air can circulate freely around them. Allow the hot jars to cool undisturbed at room temperature for a full twenty four hours. As the jars cool down, you will hear a delightful, high pitched pinging sound, which signals that the vacuum seal has formed successfully. After twenty four hours, press the center of each metal lid with your finger. If the lid stays completely flat and does not move or pop back, your jar is properly sealed and safe to store. Store your sealed jars in a cool, dark, dry pantry for up to one year.
Why This Recipe Is Special
This home canned salsa recipe stands out because it strikes an ideal balance between incredible flavor, vibrant texture, and absolute canning safety. Unlike store bought salsa that often relies heavily on chemical preservatives and artificial flavor enhancers, this pure recipe uses natural acidity from real lemon or lime juice alongside fresh, healthy ingredients. Tomatoes are a phenomenal source of lycopene, a powerful natural antioxidant that supports heart health and reduces oxidative stress in the body. The inclusion of fresh onions, garlic, and colorful peppers provides generous amounts of vitamin C, essential minerals, and dietary fiber that support strong immune function and digestive health.
From a culinary perspective, this recipe is uniquely special because of its rich, complex flavor structure. Simmering the fresh produce together before processing allows the naturally sweet notes of the ripe tomatoes to blend seamlessly with the warm savory spice of the garlic, cumin, and peppers. The touch of sugar perfectly cuts through the sharp acidity without making the sauce taste sweet. It creates a well rounded condiment that elevates everyday meals from simple to gourmet. Furthermore, because this salsa is naturally low in calories and completely fat free, it allows you to add exciting, robust taste to your daily diet without compromising your health or fitness goals.
Extra Tips for Better Taste
-
Roast Your Vegetables First: For a deep, smoky undertone, grill your fresh tomatoes, peppers, and onions over high heat until the outer skins show light charred marks before you chop and cook them.
-
Select Meatier Tomatoes: Use dense, meaty tomato varieties like Roma or San Marzano because they contain less watery juice, which naturally produces a much thicker salsa texture without extra boiling time.
-
Control the Spice Level: Adjust the fiery heat of your salsa by mixing different pepper varieties while keeping the total measured quantity of peppers exactly the same to preserve safe canning ratios.
-
Never Skip Acid Measures: Always use commercial bottled juice rather than fresh fruit juice because consistent acidity levels are critical for preventing food spoilage inside sealed jars.
-
Add Fresh Herbs Wisely: Keep dried spices and fresh cilantro strictly within the recommended measurements, because adding excessive raw herbs can lower overall acidity and alter preservation safety.
-
Let Flavors Mature: Allow your canned salsa to rest in your dark pantry for at least two full weeks after canning before opening the first jar, as the flavors become much richer over time.
-
Chill Before Serving: Place your sealed jar of salsa in the refrigerator for several hours right before serving, as cold temperature enhances the crisp, refreshing contrast of the vegetables.
Final Thoughts
Taking the time to make your own canned salsa is a deeply satisfying culinary tradition that brings immense joy to your kitchen and delicious flavor to your table. There is nothing quite like looking at a pantry shelf lined with colorful jars of homemade food that you prepared with your own hands using simple, clean ingredients. This reliable recipe guarantees safe, mouthwatering results every single time, whether you are a complete beginner or an experienced home preservation enthusiast. Grab your fresh produce, gather your canning supplies, and enjoy the wonderful, rewarding process of preserving your very own fresh salsa today.
Nutrition Details
| Nutrient Component | Amount Per Serving | Daily Value Percentage |
| Total Calories | 25 kcal | 1% |
| Total Fat | 0.2 g | 0% |
| Saturated Fat | 0 g | 0% |
| Sodium | 210 mg | 9% |
| Total Carbohydrates | 5.5 g | 2% |
| Dietary Fiber | 1.2 g | 5% |
| Sugars | 3.2 g | 0% |
| Protein | 0.9 g | 2% |
| Vitamin C | 18 mg | 20% |
| Vitamin A | 450 IU | 9% |
| Calcium | 15 mg | 1% |
| Iron | 0.4 mg | 2% |
Nutrition values are based on an average serving size of two tablespoons or approximately thirty grams of finished salsa.
Disclaimer
Every human body is unique, and individual nutritional needs, dietary restrictions, and health responses vary from person to person. The health and nutritional information provided in this article is meant for general educational purposes only and should never replace professional medical advice, diagnosis, or treatment. Always follow established high acid food canning guidelines strictly to ensure absolute food safety in your home. Consult with a qualified healthcare professional or registered dietitian before making significant changes to your regular diet or introducing new preserved foods if you have existing health conditions, severe allergies, or digestive sensitivities.