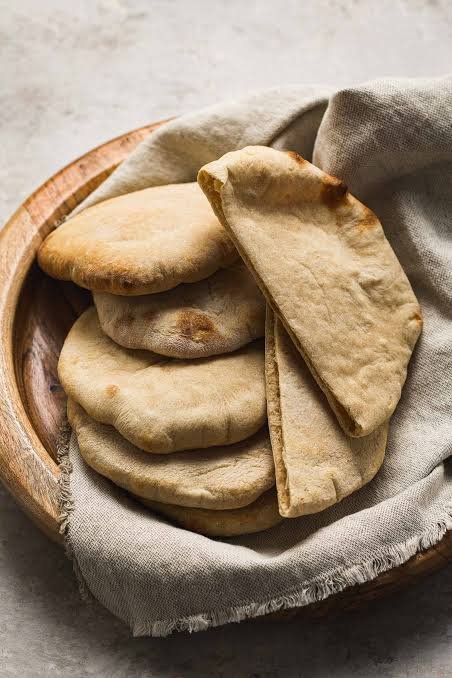
Making bread at home is one of the most comforting activities you can do in your kitchen. Today you will learn how to make fresh overnight sourdough pita bread right in your own oven. Pita bread is a flat round bread that naturally puff up during baking to create a hollow pocket inside. When you combine this traditional middle eastern bread with natural wild yeast sourdough starter, something magical happens to the texture and flavor. The long fermenting time overnight gives the flour plenty of hours to break down, which creates a rich flavor profile that store bought bread simply cannot match. You do not need any artificial chemicals, commercial yeast packets, or complex equipment to achieve incredible results. Every single step in this guide uses simple kitchen tools and basic techniques that anyone can master.
Many home cooks are choosing sourdough over traditional baking methods because of how wonderful it makes them feel. Sourdough pita bread has a soft chewy structure on the outside and a light airy pocket on the inside. The natural fermentation process produces a mild sour taste that pairs wonderfully with both sweet and savory fillings. People love this recipe because it saves money while delivering bakery quality bread directly to your kitchen counter. You can prepare the simple dough in the evening, let it rest calmly while you sleep, and bake warm pitas the next day. It fits naturally into a busy weekly routine because the refrigerator does most of the hard work for you. Bringing these golden flatbreads to your family dinner table brings a deep sense of pride and comfort.
There are so many fantastic reasons to make this recipe for your household. From a fitness and health viewpoint, overnight fermented dough is much easier on your stomach than fast rising commercial breads. The friendly bacteria and wild yeast break down gluten proteins and natural phytic acid during the long night rest. This long rest makes the final bread far easier to digest while allowing your body to absorb more vitamins and minerals from the grain. From a pure taste perspective, nothing compares to the smell of fresh warm bread filling your home on a quiet morning or afternoon. Eating warm pita pockets filled with your favorite roasted vegetables, grilled chicken, or creamy hummus creates an unforgettable meal experience. It brings warmth to cold winter days and light fresh joy to summer afternoon lunches.
Whether you are hosting a fun backyard weekend party or simply cooking healthy meals for your family, this recipe is your perfect companion. Children love watching the flat circles of dough miraculously puff up like little balloons inside the hot oven. It feels like a fun science experiment and a delicious cooking project combined into one simple activity. You can prepare a double batch of dough and keep it in your refrigerator for several days to bake fresh bread whenever you need it. Taking control of your food ingredients gives you complete peace of mind because you know exactly what goes into your body. This classic recipe will quickly become a cherished favorite in your weekly meal planning routine.
Ingredients You Will Need
To create the best homemade sourdough pita bread, you only need five simple pantry staples. Using good quality ingredients will ensure your bread turns out soft, tender, and delicious every single time.
Active Sourdough Starter
You will need one hundred grams of active sourdough starter. Make sure your starter was fed about four to six hours before mixing so it is bubbly, active, and floating in water.
Warm Water
You will need two hundred and thirty grams of clean warm water. The water temperature should feel warm to the touch, roughly room temperature or slightly warmer, to keep the wild yeast happy.
Unbleached All Purpose Flour
You will need three hundred and fifty grams of unbleached all purpose flour or bread flour. Bread flour gives a slightly chewier pocket, while all purpose flour creates a softer flatbread.
Fine Sea Salt
You will need seven grams of fine sea salt. Salt provides essential flavor to the dough and strengthens the gluten structure so your pita can stretch without tearing.
Olive Oil
You will need fifteen grams of extra virgin olive oil. The oil adds moisture to the bread, keeps the crumb soft for days, and helps the dough stretch smoothly during rolling.
Step By Step Method
Following these clear steps will guide you from raw ingredients to warm puffy pitas without any stress. Take your time and enjoy the calm process of hand baking.
Step 1: Mixing the Dough
Start by placing your mixing bowl on a digital kitchen scale. Pour in two hundred and thirty grams of warm water and add one hundred grams of active sourdough starter. Use a fork or a wooden spoon to whisk the starter and water together until the liquid looks milky and bubbly. Next, add fifteen grams of extra virgin olive oil to the liquid mixture. Pour in three hundred and fifty grams of flour along with seven grams of fine sea salt. Stir everything together with a heavy spoon until a rough shaggy dough forms and no dry white flour remains at the bottom of your bowl.
Step 2: Resting and Kneading
Cover the mixing bowl with a clean damp kitchen towel or a plastic plate. Let the dough rest undisturbed on your kitchen counter for thirty minutes. This brief rest period is called an autolyse, which allows the flour to fully absorb the water and makes kneading much easier. After thirty minutes, clear a small space on your kitchen counter. Lightly wet your hands with warm water and begin kneading the dough directly in the bowl or on your clean counter. Stretch the edge of the dough upward and fold it over into the center. Rotate the bowl slightly and repeat this stretch and fold action for about four to five minutes until the dough becomes smooth and elastic.
Step 3: The Overnight Bulk Fermentation
Shape your kneaded dough into a neat round ball and place it back inside your lightly oiled mixing bowl. Cover the bowl tightly with plastic wrap or a secure lid so the dough does not dry out during the night. Place the covered bowl inside your refrigerator for twelve to sixteen hours. During this long cool rest, the wild yeast will slowly digest the sugars in the flour. The long cool environment develops a rich complex flavor without letting the dough over rise or turn excessively sour.
Step 4: Division and Resting
The next morning, remove your dough bowl from the refrigerator. The dough should look somewhat expanded, soft, and smell pleasantly sweet and yeasty. Lightly dust your clean kitchen counter with a small amount of extra flour. Gently tip the cold dough out onto the floured surface. Using a bench scraper or a sharp knife, divide the dough into eight equal portions. Each piece should weigh around eight-five grams. Roll each small piece of dough into a tight smooth ball by cupping your palm over the dough and making gentle circular motions against the counter. Cover the dough balls with a light cloth and let them rest for thirty minutes to relax the gluten.
Step 5: Rolling the Pitas
Preheat your home oven to five hundred degrees Fahrenheit or two hundred and sixty degrees Celsius. Place a baking steel, heavy baking stone, or inverted heavy baking sheet on the middle rack while the oven heats up. Letting your baking surface heat up for at least forty five minutes is crucial because intense bottom heat is what creates the steam pocket inside the pita. Dust one dough ball with flour and use a rolling pin to flatten it into a thin round circle about six inches wide and one quarter inch thick. Keep your rolling gentle and even so you do not pinch the edges shut.
Step 6: Baking the Pitas
Carefully place two or three rolled dough rounds directly onto your scorching hot baking stone or sheet inside the hot oven. Close the oven door quickly to trap the high heat inside. Watch through the oven window as the flat dough begins to react to the extreme heat. Within two to three minutes, the steam trapped inside will expand rapidly, causing the flat dough to puff up like a large round pillow. Let the pitas bake for another one minute after puffing so the crust sets without becoming hard or brown. Total baking time is usually three to four minutes per batch.
Step 7: Cooling and Stacking
Use long tongs or a spatula to carefully remove the hot puffed pitas from the oven. Immediately place the baked pitas on a clean wire cooling rack and cover them with a clean dry kitchen towel. Wrapping the hot pitas in a towel traps the escaping steam, which softens the outer crust and ensures your pitas stay flexible for folding and stuffing. Repeat the rolling and baking process with your remaining dough balls until all your fresh pitas are cooked.
Why This Recipe Is Special
This overnight sourdough pita bread recipe stands out from basic bread recipes for many practical and health reasons. Understanding why this method works so well will boost your confidence in the kitchen.
Superior Natural Flavor
Commercial store bought flatbreads often rely on artificial flavorings, preservatives, and rapid yeast to produce bread quickly. In contrast, this sourdough method relies on slow biological processes. The long overnight rest creates natural lactic and acetic acids that give the bread a deep complex flavor with just a hint of tanginess that enhances any filling you put inside.
Better Digestion and Gut Health
Many people who experience mild discomfort from regular commercial bread find that long fermented sourdough causes no such issues. The naturally occurring friendly bacteria break down complex starches and hard to digest proteins over many hours. This natural pre digestion process makes the finished flatbread gentle on your digestive tract while promoting healthy gut flora.
Long Lasting Softness Without Preservatives
Adding a small amount of extra virgin olive oil combined with the high moisture retention of sourdough keeps these pitas soft for days. You do not need any chemical softeners or artificial shelf extenders. When wrapped properly at room temperature, these breads stay tender, pliable, and delicious for your daily lunch needs.
Extra Tips for Better Taste
Small details in the kitchen can elevate your baking from good to extraordinary. Use these simple expert secrets to get the absolute best results from your oven.
Use High Quality Whole Wheat Flour Mix
You can replace up to twenty percent of the white all purpose flour with fresh whole wheat flour or rye flour. This tiny swap adds an incredible nutty taste and a rich golden color to your pitas without making the dough heavy or dense.
Brush With Garlic Herb Butter
As soon as your pitas come out of the hot oven, lightly brush the top crust with melted butter mixed with finely minced fresh garlic and chopped parsley. This turns a simple flatbread into an irresistible side dish for soups, stews, and fresh salads.
Ensure Proper Oven Heat
The number one reason pitas fail to puff into pockets is an oven that is not hot enough. Make sure your oven reaches its highest possible temperature before sliding the dough inside. That sudden shock of intense heat is the secret mechanism that turns water into fast expanding steam.
Store and Reheat Correctly
Store your cooled pitas inside a sealed zip top plastic bag at room temperature for up to three days. When you are ready to eat one, splash a few drops of water on the surface and warm it in a dry skillet on medium heat for thirty seconds on each side. It will become as soft and fluffy as the moment it was baked.
Nutrition Details
Knowing the nutritional makeup of your food helps you make smart eating choices for your lifestyle goals. Sourdough flatbread provides healthy carbohydrates, clean energy, and minimal fats.
| Nutritional Component | Value Per Serving (One Pita) |
| Total Calories | 195 kcal |
| Carbohydrates | 36 g |
| Dietary Fiber | 2 g |
| Total Sugars | 0 g |
| Protein | 6 g |
| Total Fat | 3 g |
| Saturated Fat | 0.5 g |
| Sodium | 340 mg |
| Potassium | 65 mg |
| Iron | 2 mg |
Final Thoughts
Baking your own overnight sourdough pita bread at home is a deeply rewarding culinary journey that transforms simple ingredients into wholesome nourishment. Once you experience the delightful taste and soft texture of a warm homemade pita pocket, you will never want to return to dry store bought options. The overnight resting method removes all the stress from traditional baking, allowing you to fit fresh bread making seamlessly into your everyday daily schedule. Share these wonderful flatbreads with your family, fill them with your favorite nutritious toppings, and enjoy the pure satisfaction that comes from mastering a classic kitchen craft.
Disclaimer
This article is provided for general informational and educational purposes only. Individual dietary needs, digestive responses, and nutritional requirements vary from person to person. While sourdough fermentation generally aids digestion for many individuals, it is not a guaranteed cure for specific medical conditions or severe gluten intolerances such as celiac disease. Always consult with a qualified health professional or registered dietitian regarding any specific health concerns or major dietary modifications.