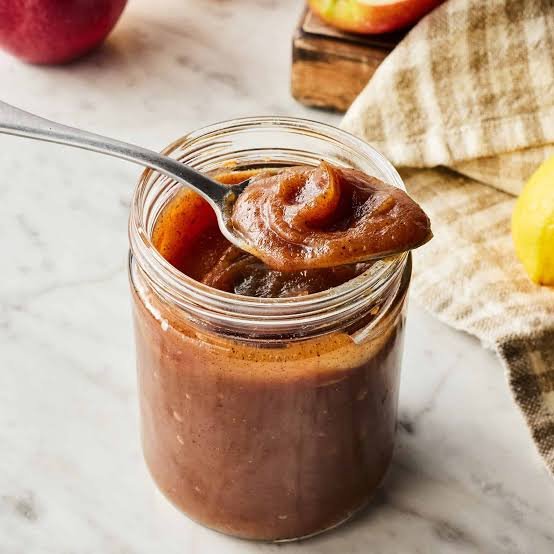
Making your own homemade apple butter is one of the most rewarding kitchen projects you can ever take on, especially when autumn arrives with its huge harvest of fresh apples. Apple butter is not actually real butter, but rather a very thick, smooth, and concentrated fruit spread that has been cooked down slowly until the natural sugars caramelize into a deep reddish brown color. Unlike regular apple sauce which is light, grainy, and mild, apple butter is rich, silky, and packed with warm spice flavors like cinnamon, nutmeg, and cloves. The process of slow cooking allows all the water content to evaporate slowly, leaving behind a rich spread that feels luxurious when wiped across warm toast or stirred into breakfast oatmeal. Making it at home using fresh ingredients gives you complete control over the sweetness, the spice levels, and the quality of the apples used, ensuring that every single jar is packed with pure, wholesome goodness without any artificial preservatives or hidden chemicals.
People absolutely love homemade canned apple butter because it brings back sweet memories of traditional country cooking and old fashioned kitchens filled with amazing aromas. There is something truly special about opening a jar that you canned yourself on a chilly morning, feeling the warmth of those autumn spices instantly lift your mood and wake up your senses. Families love keeping this versatile spread in their pantries because it turns simple meals into delicious treats with almost zero effort. Kids love it on hot pancakes or waffles, adults love pairing it with savory cheese boards, and bakers love using it as a natural sweetener in muffins, cakes, and quick breads. Beyond its incredible flavor, people adore this recipe because it makes the whole house smell like a warm autumn day for hours while it slowly simmer on the stove or in a slow cooker. It is a nostalgic comfort food that connects us to simple traditions and wholesome homemade eating.
You should consider making this delicious recipe whenever you find yourself with an abundance of fresh fall apples, whether you went apple picking at a local orchard or found a great sale at the grocery store. It is the perfect weekend cooking project when you want to relax at home and fill your kitchen with comforting scents that instantly reduce stress after a long busy week. From an emotional perspective, preparing and canning your own food gives you a profound sense of pride, self reliance, and accomplishment that store bought food simply cannot provide. From a wellness perspective, making your own apple butter allows you to drastically cut down on refined sugar compared to commercial brands, giving you a heart healthy and low fat spread that is gentle on your digestive system. It is also an extraordinary gift to share with friends, family members, neighbors, or teachers during the holiday season, showing them that you cared enough to dedicate time to making something crafted with love.
The canning process itself is remarkably simple once you learn the basic safety steps, making this project ideal for complete beginners who want to start their home preservation journey. Apple butter has natural high acidity, especially when paired with a splash of fresh lemon juice, which makes it one of the safest and most reliable foods to preserve using a basic water bath canner. By canning your batch properly, you can safely store these jars at room temperature in your pantry for up to a whole year, allowing you to enjoy the fresh taste of peak season apples all through the winter, spring, and summer months. Every time you pop open a sealed jar, you will experience that crisp autumn flavor all over again, making every minute of slow cooking completely worth the effort. It is a practical, economical, and deeply satisfying tradition that will quickly become a favorite yearly ritual for your entire household.
Ingredients You Will Need
To create a large batch of delicious canned apple butter, gather the following fresh and simple ingredients before you begin cooking:
-
Six pounds of fresh apples, peeled, cored, and sliced thick (use a mix of sweet apples like Gala or Honeycrisp along with tart apples like Granny Smith)
-
Two cups of pure apple cider or unfiltered apple juice
-
One cup of light brown sugar, packed tightly
-
One cup of granulated white sugar
-
Two tablespoons of ground cinnamon
-
One teaspoon of ground nutmeg
-
One half teaspoon of ground cloves
-
One half teaspoon of ground allspice
-
One quarter teaspoon of fine sea salt
-
Two tablespoons of fresh lemon juice
Step by Step Method
Phase 1: Preparing Your Apples and Canning Equipment
Start by washing all your fresh apples thoroughly under cool running water to remove any dirt or wax. Using a sharp knife or a handy apple corer, peel off the skins, remove the inner cores, and slice the apples into thick, uniform pieces.
Before starting the cooking process, prepare your canning equipment so everything is clean and ready. Wash six pint size mason jars along with their metal rings and brand new lids in warm, soapy water, and rinse them completely. Place your clean jars into a large water bath canner filled with hot water, keeping them warm on low heat so they will not crack when filled with hot cooked apple butter later on.
Phase 2: Slow Cooking the Apple Base
Place all your prepared apple slices into a large, heavy bottomed stockpot or a large slow cooker. Pour the two cups of fresh apple cider directly over the sliced apples to provide the liquid needed to soften them without burning. Cover the pot with a lid and set the stove heat to medium low, or set your slow cooker to high heat.
Allow the apples to simmer gently for about forty five minutes to one hour, stirring occasionally, until the apple slices become extremely soft, tender, and fall apart when pressed with a wooden spoon.
Phase 3: Pureeing for a Silky Texture
Once the apples are completely soft, remove the pot from the heat source and let the mixture cool down for a few minutes. To achieve that signature silky smooth texture, puree the cooked apples using an immersion blender right in the pot.
If you do not own an immersion blender, carefully transfer the hot apple mixture in small batches into a standard kitchen blender or food processor, holding the lid down tightly with a towel, and process until no lumps remain. Return the smooth sauce back into your large cooking pot.
Phase 4: Adding Spices and Caramelizing
Add the brown sugar, white sugar, ground cinnamon, ground nutmeg, ground cloves, ground allspice, sea salt, and fresh lemon juice directly into the smooth apple puree. Stir everything continuously until the sugars dissolve fully into the mixture.
Set the heat to low, leaving the pot partially uncovered so steam can escape. Allow the puree to simmer very slowly for three to four hours on the stove top, or eight to ten hours on low heat in a slow cooker. Stir the mixture frequently, especially near the bottom of the pot, to prevent sticking or burning as the liquid evaporates and the spread thickens into a dark, glossy mahogany color.
Phase 5: Testing for Proper Thickness
To test if your apple butter has reached the ideal thickness for canning, spoon a small amount onto a cold plate that has been resting in your freezer. Let the plate sit flat for two minutes on your counter.
If no rim of watery liquid separates around the edges of the mound, and if the spread holds its shape without running when you tilt the plate, your apple butter is perfectly cooked and ready for preservation.
Phase 6: Filling the Canning Jars
Carefully lift your warm, sterilized mason jars out of the hot water bath using jar tongs, and place them on a clean kitchen towel laid out on your counter. Place a wide mouth canning funnel into the top of the first jar.
Ladle the hot apple butter carefully into the jar, leaving exactly one half inch of empty space at the top, which is known as headspace. Run a clean plastic spatula or bubble remover tool down the inside edges of the jar to release any trapped air bubbles. Wipe the top rim of the glass jar with a damp paper towel to clean off any sticky residue, place a new flat metal lid centered on top, and screw the metal band down until it is fingertip tight.
Phase 7: Processing in the Water Bath Canner
Place the filled jars carefully back into the large water bath canner using your jar tongs, ensuring that the jars stand upright and do not touch each other directly. Ensure that the hot water in the pot covers the tops of all the jar lids by at least one to two full inches.
Turn the heat up to high and bring the water bath to a rolling boil. Once the water boils vigorously, set a timer and process pint jars for exactly fifteen minutes (adjust for higher altitudes if you live elevated far above sea level).
Phase 8: Cooling and Checking the Seals
When the processing timer finishes, turn off the stove heat, remove the canner lid carefully, and let the jars sit undisturbed in the hot water for five full minutes. Use your jar tongs to gently lift the hot jars out of the water and place them onto a thick, dry kitchen towel resting on a flat surface away from cold drafts.
Let the jars rest completely undisturbed for twenty four full hours. As they cool, you will hear a distinct, satisfying popping sound, which signals that a vacuum seal has successfully formed. After a full day, press the center of each metal lid with your finger; if the lid stays flat and does not flex or pop up, your canning process was a success. Label your sealed jars with the date and store them in a cool, dark pantry.
Why This Recipe Is Special
This homemade canned apple butter recipe stands out because it focuses on natural ingredients, traditional slow cooking methods, and perfect flavor balance without relying on artificial additives. Many store bought fruit spreads rely heavily on high fructose corn syrup, artificial food colors, and chemical thickeners to achieve long shelf lives and artificial shine.
In contrast, this simple recipe uses the natural fruit pectin found inside real apples combined with slow heat evaporation to create a thick, velvety texture naturally. The combination of both brown and white sugars creates a deep caramel flavor profile that accentuates the natural sweetness of fresh fruit instead of masking it with harsh sugar intensity.
From a health and wellness perspective, making your own apple spread gives you a wholesome, nutrient rich topping that supports a clean eating lifestyle. Apples are packed with dietary fiber, particularly pectin, which helps maintain smooth digestion and supports overall gut health.
They also contain essential antioxidants like vitamin C and beneficial plant compounds that help protect your body from cellular inflammation. Because this recipe contains zero added oils or fats, it serves as a wonderful, heart healthy replacement for traditional dairy butter or high fat margarine on breakfast toast, warm biscuits, or morning oatmeal.
Another reason this recipe is so remarkable is its amazing versatility in everyday cooking and baking. While it shines brightly as a simple spread on baked goods, it also acts as a secret flavor booster in many complex dishes across your weekly menu. You can swirl it into Greek yogurt for a low calorie dessert, brush it onto roasted chicken or pork tenderloin as a flavorful glaze during the final minutes of cooking, or mix it into marinades for a sweet and savory kick.
Having a shelf stable pantry stocked with this delicious spread means you always have a quick way to elevate everyday meals into memorable dining experiences for your family.
Extra Tips for Better Taste
To make your batch of apple butter truly unforgettable, try using a combination of at least three different apple varieties rather than relying on just one type. Combining sweet varieties like Gala, Fuji, or Red Delicious with crisp, tart varieties like Granny Smith or Jonathan produces a complex, balanced flavor foundation that feels vibrant on the palate.
If you want to add an even deeper warm spice character, consider throwing a whole star anise pod or a fresh cinnamon stick directly into the pot while the mixture simmers down, removing them right before filling your canning jars.
For a unique gourmet variation, try replacing half of the regular apple cider with fresh, unfiltered pear juice or pear cider, which adds a delicate blossom sweetness to the finished product. A small dash of pure vanilla extract added during the final five minutes of cooking elevates the caramel notes and rounds out the sharp spice edges beautifully.
If you enjoy a tiny hint of brightness, grate a teaspoon of fresh orange zest into the pot alongside the ground spices to give the rich spread a subtle citrus lift that cuts through the deep sweetness.
Always pay close attention to your heat control during the long reduction stage to prevent any scorch marks on the bottom of your pot. Scratched or burnt apple butter will carry a bitter, smoky taste throughout the entire batch that cannot be fixed, so using a thick, heavy bottomed stainless steel pot or an enamel coated dutch oven makes a huge difference.
Using a flat edged wooden spoon or silicone spatula allows you to scrape the bottom surface smoothly as you stir every fifteen to twenty minutes, keeping the texture uniform, silky, and free from dark burnt flecks.
Final Thoughts
Making and canning your own rich apple butter at home is a simple, fulfilling journey that fills your kitchen with wonderful aromas and provides your home pantry with months of delicious, wholesome enjoyment. It brings a simple sense of comfort to everyday breakfasts, turns ordinary snacks into cozy treats, and serves as a thoughtful, handcrafted gift that loved ones will genuinely appreciate receiving. Once you taste the rich, caramelized goodness of a homemade batch prepared with real fruit and warm spices, you will never want to go back to plain store bought spreads again. Gather your favorite apples, embrace the slow cooking process, and enjoy the delicious fruits of your labor all year long.
Nutrition Details
Below is the estimated nutrition breakdown for a standard serving size of homemade apple butter, based on a single batch yield divided into pint jars:
| Nutrient Component | Amount Per Serving (1 Tablespoon) |
| Total Calories | 35 Calories |
| Total Fat | 0 Grams |
| Saturated Fat | 0 Grams |
| Cholesterol | 0 Milligrams |
| Sodium | 10 Milligrams |
| Total Carbohydrates | 9 Grams |
| Dietary Fiber | 1 Gram |
| Sugars | 8 Grams |
| Protein | 0 Grams |
| Calcium | 4 Milligrams |
| Potassium | 25 Milligrams |
Disclaimer
This article and recipe are provided strictly for general educational and informational purposes. Everyone’s body, health conditions, dietary needs, and digestive systems are unique, so individual nutritional requirements and reactions may vary from person to person. Please consult with a qualified healthcare professional, registered dietitian, or certified medical specialist before making significant changes to your regular diet or if you have specific concerns regarding blood sugar levels, dietary sugar intake, or food allergies. Always ensure that you follow standard, verified home food preservation safety guidelines to prevent food spoilage or contamination when canning at home.