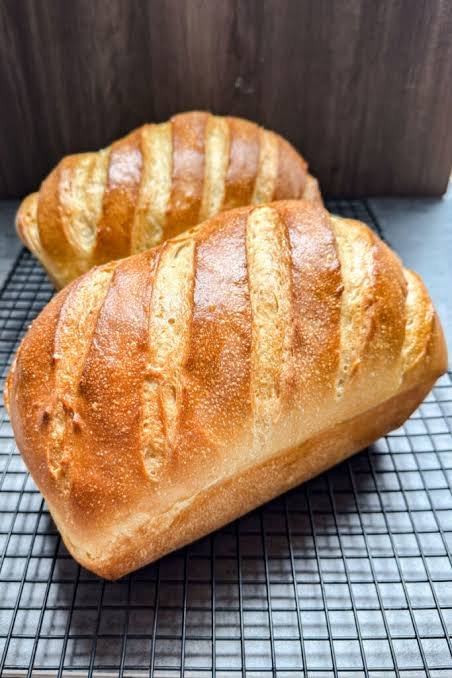
Making your own bread at home is one of the most rewarding experiences you can have in your kitchen. This complete sourdough sandwich bread recipe is designed to help you bake a loaf that is soft, tall, and full of rich flavor. Unlike traditional artisan sourdough loaves that have a very hard crust and large open holes, this recipe produces a tender crumb with a soft outer crust. It is specifically crafted to hold your favorite sandwich fillings without letting sauce spill through or hurting the roof of your mouth. Every slice is tender, pillowy, and packed with the gentle tangy goodness that only real sourdough fermentation can provide. By combining natural wild yeast with basic everyday ingredients, you can transform simple flour into a masterpiece that looks and tastes like it came straight from a professional baker.
People all over the world absolutely love this soft sourdough sandwich bread because it offers the perfect balance between classic sourdough flavor and practical daily use. Traditional sourdough can sometimes be too chewy or firm for kids or for making quick morning toast, but this sandwich loaf solves that problem completely. The addition of a little butter or oil along with a splash of milk or honey creates a smooth texture that stays fresh on your kitchen counter for days. Beginners love this recipe because it is very forgiving and does not require complex folding techniques or specialized baking equipment like a heavy cast iron Dutch oven. Families fall in love with it because it brings back the authentic taste of real bread that our grandparents used to bake, free from artificial additives, chemical preservatives, and unnatural dough conditioners.
There are so many wonderful reasons to make this bread, whether you are looking to support your physical health or warm your soul. From an emotional perspective, mixing flour and water with your hands and smelling warm bread baking in your oven brings an incredible sense of peace and comfort to your home. Taste wise, no store bought bread can ever compare to the complex and delicious flavor profile created by natural wild yeast fermentation. From a fitness and health viewpoint, sourdough bread is much easier on your stomach because the long fermentation process breaks down gluten and phytic acid, allowing your body to digest nutrients and minerals far more effectively. Whether you want to pack a healthier lunch for your children, enjoy a gourmet breakfast toast, or simply reduce your consumption of processed store foods, baking this loaf is the perfect decision.
Taking the time to bake your own sourdough sandwich bread is also a fantastic step toward living a more sustainable and self sufficient lifestyle. When you realize that you can create healthy food for your entire family using just wild yeast starter, flour, water, and salt, it changes your relationship with food forever. You no longer need to buy plastic wrapped commercial loaves that turn stale or moldy overnight in strange ways. Instead, you get to enjoy the slow living process of watching your dough rise gently throughout the day, filling your living space with an amazing, welcoming aroma. Sharing a freshly sliced loaf with your loved ones creates lasting memories and turned a simple mealtime into a special occasion that everyone looks forward to every single week.
Ingredients You Will Need
To bake one large loaf of soft sourdough sandwich bread, gather the following ingredients in your kitchen:
- Active sourdough starter: 150 grams (bubbly and well fed)
- Bread flour or unbleached all purpose flour: 500 grams
- Warm water: 250 grams (filtered water works best)
- Whole milk: 50 grams (room temperature)
- Honey or maple syrup: 25 grams
- Softened unsalted butter or coconut oil: 30 grams
- Fine sea salt or kosher salt: 10 grams
Step by Step Method
Step 1: Preparing Your Sourdough Starter
Make sure your sourdough starter is active and ready before you begin. Feed your starter about four to six hours before you plan to mix your dough. It should double or triple in volume, look very bubbly, and smell sweet and slightly fruity.
Step 2: Mixing the Wet and Sweet Ingredients
In a large glass or ceramic mixing bowl, combine the warm water, warm milk, honey, and active sourdough starter. Use a whisk or a wooden spoon to stir everything together until the starter completely dissolves into a milky liquid.
Step 3: Adding Flour and Initial Mixing
Add the bread flour into the liquid mixture. Stir with a strong spoon or your hands until all the dry flour is fully absorbed and a shaggy dough forms. Cover the bowl with a clean damp kitchen towel and let it rest for thirty minutes. This quiet rest period is called autolyse, and it helps the flour absorb liquid and softens the gluten structure.
Step 4: Adding Salt and Butter
After thirty minutes, add the fine sea salt and softened unsalted butter to the dough. Knead the dough inside the bowl or on a clean kitchen counter for about eight to ten minutes. Press down with the palm of your hand, push forward, fold back, and repeat. The dough will start wet and sticky, but as you knead, it will become smooth, elastic, and soft.
Step 5: Bulk Fermentation First Rise
Place the smooth ball of dough back into a lightly oiled bowl. Cover it tightly with plastic wrap or a damp towel to keep it from drying out. Let the dough rise at room temperature for about six to eight hours. The exact time depends on how warm your kitchen is. You want the dough to rise by about fifty percent in size and feel light and airy when you gently touch it.
Step 6: Shaping the Sandwich Loaf
Gently pour the risen dough onto a lightly floured surface. Press down lightly with your fingers to flatten it into a flat rectangle shape. Fold the left side into the center, then fold the right side over it like a letter. Roll the dough up tightly from the bottom to form a smooth log shape. Pinch the seams at the bottom together tightly.
Step 7: Final Rise in Loaf Pan
Lightly grease a standard loaf pan with butter or line it with parchment paper. Place your shaped dough log inside the pan with the smooth side facing up. Cover the pan loosely with a clean towel. Let it rise at room temperature for three to five hours, or until the dough rises about one inch above the rim of the loaf pan.
Step 8: Baking the Bread
Preheat your oven to 375 degrees Fahrenheit or 190 degrees Celsius. If you want a shiny soft top crust, lightly brush the top of the dough with melted butter or a little milk right before baking. Place the pan on the center rack of your oven and bake for 35 to 40 minutes. The top should be a beautiful golden brown color and the internal temperature of the loaf should reach 200 degrees Fahrenheit when tested with a thermometer.
Step 9: Cooling the Loaf Properly
Remove the loaf pan from the oven carefully. Let the bread sit in the pan for ten minutes, then gently transfer the loaf onto a wire cooling rack. Allow the bread to cool completely for at least two hours before slicing it. Slicing warm sourdough releases trapped steam and makes the inside gummy, so patience is key.
Why This Recipe Is Special
This sourdough sandwich bread recipe stands out because it combines natural health benefits with the soft texture that people love in everyday bread. Commercial sandwich bread is often packed with chemical preservatives, extra sugars, and synthetic dough improvers designed to extend shelf life artificially. This home baked recipe uses only pure, natural ingredients, giving you complete control over what goes into your body.
The long natural fermentation process provides amazing wellness benefits. As the wild yeast and beneficial bacteria ferment the dough over many hours, they break down complex starches and phytic acid. Phytic acid is an antinutrient found in grains that can make minerals like iron, zinc, and magnesium hard for your body to absorb. By neutralizing phytic acid, sourdough allows your system to take in these nutrients much more easily. Additionally, many people who experience discomfort or bloating when eating regular commercial bread find that natural sourdough is gentle and easy to digest.
From a culinary standpoint, the addition of a small amount of fat and natural sweetener creates a tender slice that does not crumble. It holds its shape perfectly whether you are spreading heavy peanut butter, stacking meat and cheese, or grilling a hot cheese sandwich on a skillet. It provides the famous tangy sourdough depth of flavor while maintaining a light, family friendly texture that everyone loves.
Extra Tips for Better Taste
- Use rich whole milk instead of water for an even softer and richer texture.
- Substitute honey with maple syrup or agave nectar for subtle flavor variations.
- Brush the top of the dough with melted garlic butter right after taking it out of the oven for a savory crust.
- Sprinkle rolled oats, sesame seeds, or sunflower seeds over the top before baking for added crunch and nutrition.
- If you prefer a stronger sour taste, let the shaped dough rest in your refrigerator overnight for twelve hours before baking.
- Store your cooled sliced bread in a sealed bag with a piece of beeswax wrap to keep it soft for several days.
- Freeze pre sliced bread pieces so you can pull out individual slices and pop them directly into your toaster whenever you need a quick meal.
Final Thoughts
Baking your own sourdough sandwich bread is a beautiful journey that brings warmth, joy, and incredible nutrition into your home. While the long fermentation process requires patience, the actual active hands on time is very short and simple. Once you taste a fresh slice of soft homemade sourdough bread with a bit of real butter, you will never want to buy store bread again. Enjoy every step of the baking process, share your fresh loaves with friends and neighbors, and celebrate the simple joy of real food made with love.
Nutrition Details
Here is an estimated nutrition overview for the entire recipe as well as per serving slice, assuming the loaf yields twelve equal slices:
| Nutrient | Whole Recipe Total | Per Serving Slice |
|---|---|---|
| Calories | 2250 kcal | 188 kcal |
| Carbohydrates | 420 grams | 35 grams |
| Protein | 60 grams | 5 grams |
| Fat | 36 grams | 3 grams |
| Saturated Fat | 18 grams | 1.5 grams |
| Fiber | 18 grams | 1.5 grams |
| Sugar | 24 grams | 2 grams |
| Sodium | 3900 milligrams | 325 milligrams |
Disclaimer
The health and nutrition information provided in this article is for educational purposes only and is not meant to replace professional medical advice. Everyone has a unique body, and individual health conditions or dietary sensitivities vary. While many individuals find naturally fermented sourdough easier to digest than regular bread, those with diagnosed celiac disease or severe gluten allergies must avoid consuming wheat based sourdough bread. Always listen to your body and consult with a qualified doctor or clinical nutritionist for personal health decisions.