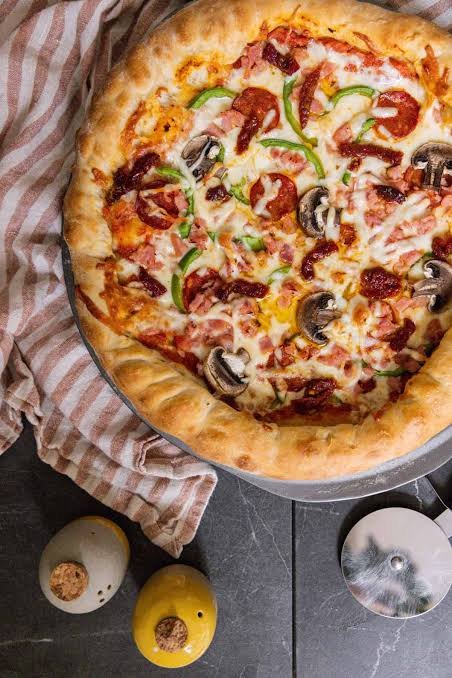
Making a delicious homemade pizza from scratch is one of the most rewarding kitchen experiences you can have, especially when you use sourdough discard as your secret base ingredient. Many home bakers who maintain a wild yeast culture know the feeling of throwing away perfectly good starter during routine feedings, which often feels like a giant waste of valuable time and flour. This simple sourdough discard pizza recipe transforms that leftover starter into an amazingly flavorful, golden crust that tastes like it came straight from a traditional wood fired oven. When you blend unfed sourdough starter into a quick pizza dough, you instantly add rich depth, a delicate tangy flavor, and a wonderful chewy texture that regular commercial yeast crusts simply cannot replicate. You will find that this project turns daily kitchen scrap into the star of your dinner table, delivering a gourmet experience using everyday pantry staples that you likely already have on hand in your home right now.
People absolutely fall in love with this sourdough discard pizza crust because it solves several common problems at once while delivering unmatched taste and texture. Traditional homemade sourdough bread can take anywhere from twelve to twenty four hours of patient waiting, stretching, and folding before you can even think about baking it in the oven. This quick discard recipe eliminates those long waiting times, giving you all the complex, tangy sourdough flavor without the exhausting, multi day baking commitment. Bakers also adore how forgiving the dough is, since it rolls out easily without snapping back or tearing like tricky high hydration doughs tend to do. It bakes up into a perfect contrast of textures, featuring a delightfully crispy bottom crust alongside a soft, airy interior that holds up under heavy sauces, melty mozzarella cheese, and all your favorite pizza toppings without ever becoming soggy or flimsy.
Making this pizza goes way beyond basic hunger because it taps into a deep sense of comfort, joyful creativity, and smart, eco friendly kitchen practices. From an emotional standpoint, there is incredible satisfaction in turning something you used to throw down the drain into a comforting meal that brings your whole family together around the table. From a taste perspective, the mild acidity from the fermented starter cuts through rich sauces and creamy cheeses, creating a balanced flavor profile that makes every single bite taste like an artisanal restaurant creation. Fitness conscious eaters and health enthusiasts also celebrate sourdough discard crusts because the natural fermentation process breaks down tough starches and gluten proteins. This natural breakdown makes the finished crust much easier on your stomach, preventing that heavy, uncomfortably bloated feeling that so often follows a night of eating cheap takeaway fast food pizzas.
Whether you are hosting a lively Friday night party with close friends, planning a fun weekend cooking activity with your kids, or simply trying to live a zero waste lifestyle, this dish fits every occasion seamlessly. Pizza night becomes a truly interactive, memorable experience when everyone gets to roll out their own dough round and decorate it with custom toppings. It is also an ideal solution for busy weeknights when you want a home cooked meal that feels special, nourishing, and deeply satisfying without spending hours hovering over a hot stove. Once you taste the incredible crackly crust and experience how easy it is to handle, you will likely start saving every single bit of your sourdough discard specifically to make this recipe. It truly elevates a simple weekend dinner into a culinary celebration that satisfies your soul while making brilliant use of every ingredient in your pantry.
Ingredients You Will Need
To make two generous twelve inch pizzas, gather the following ingredients:
-
Unfed sourdough discard: one cup or two hundred twenty seven grams
-
All purpose flour or bread flour: two and a half cups or three hundred grams
-
Lukewarm water: three quarters of a cup or one hundred seventy grams
-
Instant active yeast or active dry yeast: one teaspoon or three grams
-
Fine sea salt or table salt: one teaspoon or six grams
-
Extra virgin olive oil: two tablespoons or twenty eight grams, plus extra for greasing
-
Honey or granulated sugar: one teaspoon or five grams
-
Garlic powder: half a teaspoon, optional for extra crust flavor
-
Dried oregano or Italian seasoning: half a teaspoon, optional for extra crust flavor
Step By Step Method
Step One: Prepare Your Workspace and Mix the Liquids
Start by clearing a large, clean surface on your kitchen counter where you can comfortably work with flour and dough. Take your sourdough discard directly out of the refrigerator and measure out one full cup into a large glass or ceramic mixing bowl. Pour in three quarters of a cup of lukewarm water, making sure the liquid feels pleasantly warm to the touch but not hot, as extreme heat can ruin the yeast. Add one teaspoon of honey or sugar into the liquid mixture. Use a sturdy spoon or a whisk to mix the sourdough discard, warm water, and sweetener together until the thick starter dissolves smoothly into the liquid, forming a milky mixture.
Step Two: Add the Dry Ingredients and Form a Shaggy Dough
Pour two and a half cups of all purpose flour or bread flour into the bowl on top of your liquid mixture. Sprinkle one teaspoon of instant active yeast and one teaspoon of fine sea salt directly over the flour. If you want an extra savory boost in your crust, sprinkle in half a teaspoon of garlic powder and half a teaspoon of dried oregano at this stage. Stir everything together with a wooden spoon or spatula until the flour completely absorbs the liquid and a rough, shaggy ball of dough starts to pull away from the sides of your mixing bowl.
Step Three: Knead the Dough to Build Structure
Dust your kitchen counter lightly with a tablespoon of extra flour and tip your dough out of the bowl onto the counter. Use the palms of your hands to push the dough forward, then fold it back over itself, repeating this rhythmic kneading motion for about five to seven minutes. If the dough feels overly sticky, add a small sprinkle of flour, or if it feels too dry and crumbly, wet your hands with warm water while kneading. Keep going until the dough becomes smooth, supple, and slightly stretchy, bouncing back gently when you press your finger into the center.
Step Four: First Rise and Flavor Development
Drizzle one tablespoon of extra virgin olive oil inside a large clean bowl and spread it around to coat the bottom and sides evenly. Place your smooth dough ball into the oiled bowl, turning it over once so the entire surface gets lightly coated in olive oil to prevent a dry skin from forming. Cover the top of the bowl tightly with a sheet of plastic wrap or a damp kitchen towel. Place the covered bowl in a warm, draft free spot in your kitchen for about one to two hours, allowing the dough to double in size as the yeast produces small gas bubbles inside.
Step Five: Preheat Your Oven and Baking Surface
While your dough finishes rising, prepare your baking station to get maximum heat, which is essential for a crispy bottom crust. Position your oven rack in the lower third of your oven and place a baking stone, baking steel, or a large heavy baking sheet directly onto the rack. Preheat your oven as high as it can safely go, ideally between four hundred fifty degrees and five hundred degrees Fahrenheit. Letting your oven preheat for at least forty five minutes ensures that your baking surface retains intense, even heat that crisps up the bottom crust rapidly as soon as the pizza hits the oven.
Step Six: Divide and Shape the Dough
Uncover your risen dough and gently press your fist into the center to release any trapped air bubbles. Divide the dough into two equal portions using a bench scraper or a sharp kitchen knife if you want two thin crust pizzas, or keep it as one large piece for a thick pan pizza. Lay a sheet of parchment paper down on your counter and place one piece of dough in the middle. Use your fingertips or a rolling pin to stretch and press the dough out into a twelve inch round circle, leaving the outer edges slightly thicker to form a nice puffy outer crust perimeter.
Step Seven: Add Sauces, Cheeses, and Toppings
Brush the top of your shaped dough lightly with olive oil to prevent the wet toppings from seeping into the raw crust during baking. Spread a thin, even layer of your favorite tomato pizza sauce, pesto, or white garlic cream sauce across the surface, leaving a half inch border along the edge. Sprinkle a generous layer of shredded low moisture mozzarella cheese across the sauce. Add your chosen cooked meats, sliced vegetables, fresh herbs, or additional spices, taking care not to overload the center so the pizza bakes evenly without becoming soggy.
Step Eight: Bake to Golden Perfection
Carefully slide a flat baking sheet or pizza peel under your parchment paper holding the loaded pizza. Carefully transfer the parchment paper and pizza directly onto the hot baking stone or preheated sheet inside your hot oven. Bake for ten to twelve minutes, keeping a close eye on the progress through the oven door. Your sourdough discard pizza is fully cooked when the outer crust turns a deep golden brown with light blisters, the bottom is crisp and firm, and the cheese on top bubbles happily with light brown spots.
Step Nine: Cool, Slice, and Serve Fresh
Use your pizza peel or oven mitts to carefully remove the hot pizza from the oven and transfer it onto a wooden cutting board. Let the pizza rest untouched for two to three minutes so the melted cheese can set slightly, which prevents all the cheese from sliding off when you cut it. Use a sharp pizza wheel or a long chef knife to slice the pie into six or eight neat triangular slices. Serve immediately while hot and crispy, enjoying the incredible contrast between the crunchy bottom layer and the flavorful topping blend.
Why This Recipe Is Special
This sourdough discard pizza recipe stands out from basic homemade dough recipes because it marries unmatched flavor with incredible practical convenience. By utilizing leftover sourdough starter that would otherwise be discarded into the trash, you actively reduce food waste in your kitchen while saving money on grocery expenses over time. The natural acids created by the lactic acid bacteria in the sourdough discard give the crust a rich, savory complexity that plain yeast doughs cannot replicate without days of long cold fermentation in the refrigerator.
From a health and nutrition perspective, incorporating sourdough discard offers unique wellness benefits that make eating pizza much gentler on your digestive system. The mild fermentation process partially ferments the starches and breaks down complex gluten bonds before baking, making it significantly easier for your body to process the final crust. Many people who experience mild sensitivity, heaviness, or sluggishness after eating conventional white flour pizzas find that sourdough crusts do not trigger those same unpleasant digestive issues. Furthermore, controlling your own fresh ingredients allows you to minimize excess sodium, eliminate synthetic chemical preservatives, and control the quality of healthy fats used in your meal.
Taste wise, this crust achieves the holy grail texture that every pizza enthusiast searches for in a homemade recipe. It delivers a satisfying crackly crunch on the bottom while maintaining a light, tender, and chewy interior that holds up under heavy sauces and toppings. The edge crust puffs up beautifully with tiny pocket blisters, delivering a subtle sour tang that cuts through rich, salty cheeses and sweet tomato sauces. It transforms a basic weeknight dinner into an impressive, gourmet meal that feels like it came directly out of a professional pizzeria.
Extra Tips for Better Taste
To take your sourdough discard pizza from great to truly spectacular, consider adopting a few simple baker secrets that enhance both texture and flavor profile. Try dusting your parchment paper or pizza peel with fine yellow cornmeal or semolina flour before shaping your dough round. This simple step adds a wonderful rustic crunch to the bottom of your crust while preventing any sticking issues during the transfer process into your hot oven.
Another fantastic trick is to brush the outer edge of your crust with melted garlic butter or herb infused olive oil immediately after pulling the hot pizza out of the oven. Sprinkle a small pinch of grated parmesan cheese and coarse sea salt onto the freshly greased edges while they are still steaming hot. This simple addition creates an irresistible, fragrant crust edge that tastes like delicious garlic knots, ensuring that no one ever leaves their crust ends behind on the plate.
For the absolute best texture, make sure to grate your own mozzarella cheese from a block rather than buying pre shredded bag cheese from the grocery store. Pre shredded packaged cheeses are coated in cellulose powders and anti caking agents that prevent smooth melting and can create a rubbery texture on top of your crust. Freshly shredded whole milk mozzarella melts into a silky, stretchy blanket that browns evenly and integrates perfectly with your rich sourdough crust base.
Final Thoughts
Making your own sourdough discard pizza at home is one of the most fulfilling, tasty, and practical ways to make the absolute most out of your kitchen routine. It turns basic daily starter maintenance into a delightful culinary victory that satisfies your cravings while nourishing your family with simple, wholesome ingredients. Do not be afraid to experiment with different topping combinations, varying baking temperatures, or fun crust seasonings to make this adaptable recipe uniquely your own. Gather your loved ones, heat up your oven, and enjoy the magical transformation of simple discard starter into the crispest, most flavor packed pizza you have ever tasted in your life.
Nutrition Details
Below is the nutritional breakdown for this sourdough discard pizza crust recipe, calculated per serving based on eight total servings per batch, excluding additional heavy custom toppings.
| Nutritional Component | Value Per Serving | | Calories | One Hundred Eighty Five kcal | | Total Carbohydrates | Thirty Two Grams | | Dietary Fiber | Two Grams | | Sugars | One Gram | | Protein | Six Grams | | Total Fat | Four Grams | | Saturated Fat | Less Than One Gram | | Sodium | Two Hundred Ninety Milligrams | | Potassium | Sixty Five Milligrams | | Calcium | Fifteen Milligrams | | Iron | Two Milligrams |
Disclaimer
Please note that all nutritional values provided in the table above are approximate estimates based on standard ingredient measurements and general cooking guidelines. Actual nutritional content may vary depending on the specific brands of flour, olive oil, and optional crust seasonings used in your kitchen, as well as individual portion sizes and custom toppings added to the pie. Every human body is completely unique, with different metabolic rates, dietary requirements, and digestive responses to fermented grains and gluten products. The health points and digestive benefits mentioned in this article are meant for general educational and informational purposes only and should not replace professional medical advice. Always consult with a qualified doctor, certified nutritionist, or healthcare specialist if you have specific dietary restrictions, severe gluten intolerances, or medical conditions regarding your diet.