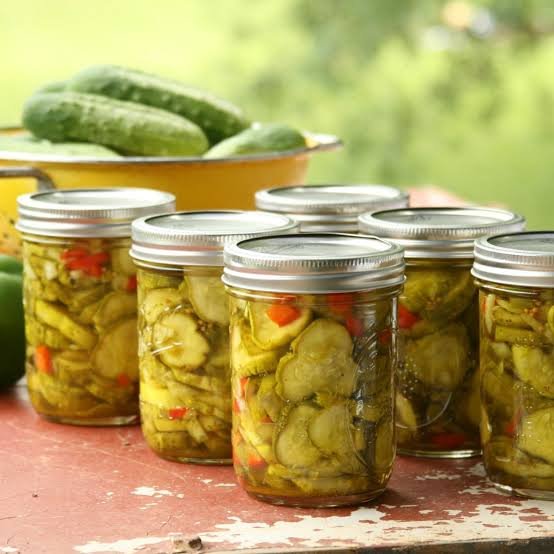
Making your own homemade pickles and canned vegetables is one of the most rewarding kitchen projects you can ever try. This specific canning brine recipe brings together the sharp punch of distilled white vinegar, the soft fruity notes of apple cider vinegar, and the rich sweetness of sugar to create a liquid that transforms simple fresh vegetables into crunchy flavorful snacks. When you make your own brine at home, you have complete control over every single ingredient that goes into your glass jars. You do not have to worry about weird artificial preservatives, excessive processing, or mystery chemical additives that are often hidden inside store bought jars sitting on grocery store shelves. Learning how to balance sweet and tangy flavors in a pickling liquid gives you a super useful kitchen skill that you can rely on year after year, especially when garden vegetables are abundant and cheap.
Many home cooks and food lovers fall completely in love with this brine recipe because it strikes the most perfect balance between sweet, sour, bold, and spicy elements. The clever combination of two different vinegar types ensures that you get a crisp clean acidity without making the pickle taste harsh or overwhelming to your mouth. The addition of aromatic spices like whole cloves, mustard seeds, celery seeds, and a cinnamon stick creates a wonderfully complex background flavor that makes every bite taste like an artisanal gourmet creation. It is a foolproof recipe that delivers consistent results every single time, making it a reliable favorite for both seasoned home preservers and total beginners who have never processed a single jar in their lives. Once you taste vegetables preserved in this handcrafted liquid, it becomes almost impossible to go back to buying commercial brands from the supermarket.
There are so many wonderful reasons and occasions to make a batch of this flavorful pickling liquid in your home kitchen today. During the late summer and early autumn months, home gardens and local farmers markets produce far more fresh vegetables than most families can eat before they go bad. Making this brine allows you to save that vibrant harvest so you can enjoy the delicious taste of summer crops during the cold winter months. Emotionally, the act of canning and preserving food connects us to traditional cooking wisdom and brings a deep sense of proud accomplishment as you fill your pantry shelves with colorful glowing jars. From a health and fitness perspective, crispy pickles prepared in a clean homemade spice brine provide a refreshing low calorie snack option that can instantly satisfy your cravings for something crunchy and savory without adding unnecessary unwanted fats or excess calories to your daily diet.
Taking the time to slow down and craft your own food from scratch also creates wonderful opportunities to share love with your family and friends. Imagine handing someone a beautiful clear glass jar filled with brightly colored sliced cucumbers, onions, or green tomatoes, all preserved in a golden spiced liquid made entirely by your own hands. Homemade gifts like this carry so much warmth and personal care, far more than anything you could quickly purchase from a shopping mall or corner market. Preparing this recipe fills your entire home with a cozy comforting aroma of warm spices, sweet sugar, and tangy vinegar that immediately makes your kitchen feel like the heart of the home. Whether you are preserving an abundant garden yield, trying out a fun weekend culinary project, or simply looking to elevate your everyday sandwiches and salads, this versatile pickling brine is the ultimate solution you need.
Ingredients You Will Need
To create this incredible sweet and tangy pickling liquid, you will need to gather a few simple spice drawer essentials and basic kitchen staples. Having all your ingredients measured out before you begin cooking will make the whole process super easy and stress free.
-
1 1/4 cups white distilled vinegar with 5% acidity
-
1 cup apple cider vinegar with 5% acidity
-
2 1/4 cups granulated sugar
-
1 tablespoon whole mustard seeds
-
1 teaspoon crushed red pepper flakes
-
3/4 teaspoon celery seeds
-
1 inch whole cinnamon stick
-
A pinch of ground allspice
-
6 whole cloves
-
1/2 teaspoon ground turmeric
Step by Step Method
Preparing Your Kitchen and Tools
Before you start heating up your ingredients, make sure your working area is completely clean and organized. Wash your glass canning jars, lids, and bands in hot soapy water, then rinse them thoroughly to remove any soap residue. Keep your jars warm in a pot of hot water so they do not crack when you pour hot liquid into them later. Measure out all your dried spices, liquid vinegars, and sugar so everything is ready to go into the pan.
Combining the Ingredients
Select a non reactive stainless steel or ceramic coated saucepan to make your brine. Avoid using aluminum or iron pots because the strong acid in the vinegar can react with those metals and ruin the taste and color of your liquid. Pour the white distilled vinegar and the apple cider vinegar straight into the saucepan. Add the granulated sugar, mustard seeds, crushed red pepper flakes, celery seeds, whole cinnamon stick, ground allspice, whole cloves, and ground turmeric.
Heating and Dissolving the Sugar
Place your saucepan on the stove top over medium heat. Stir the mixture gently with a wooden spoon or heat safe spatula to help the sugar dissolve into the liquid. Keep stirring continuously as the liquid gradually warms up. Watch carefully as the sugar crystals completely disappear, turning the liquid into a smooth, bright golden syrup with spices floating happily throughout.
Bringing to a Gentle Boil
Increase the heat slightly to bring the mixture to a soft full boil. Once it reaches a boiling point, immediately reduce the heat down to low so the liquid maintains a gentle simmer. Allow the brine to simmer gently for about 5 minutes. This quick simmering step allows the hard spices like the cinnamon stick, whole cloves, and mustard seeds to release their aromatic essential oils into the vinegar mixture without losing too much total liquid volume through steam.
Preparing the Vegetables
While your liquid simmers, take your chosen fresh vegetables such as sliced cucumbers, green tomatoes, bell peppers, or sliced onions, and pack them tightly into your preheated clean glass jars. Leave about half an inch of space at the top of each jar so the liquid can fully submerge the food.
Pouring the Hot Liquid
Carefully ladle or pour the hot spiced liquid directly over the packed vegetables in your jars. Make sure the liquid completely covers all the vegetable pieces, while still leaving half an inch of empty space at the top rim of the jar. Use a clean wooden skewer or plastic utensil to slide down the inside walls of the jar to remove any trapped air bubbles.
Sealing and Processing
Wipe the rims of the jars clean with a damp paper towel to ensure no sugar or spice residue prevents a tight seal. Place the flat lids on top of the jars and screw the metal bands on until they are fingertip tight. Process the filled jars in a boiling water bath canner for the specific time recommended for your elevation and vegetable type, usually around 10 to 15 minutes. Carefully remove the jars and let them sit undisturbed on a towel for 24 hours to cool and seal properly.
Why This Recipe Is Special
Perfect Flavor Harmony
The true secret behind the success of this recipe lies in its masterfully balanced taste profile. Many basic pickling recipes rely solely on white vinegar, which can sometimes produce an overly harsh or aggressive sharp taste. By blending clear white vinegar with sweet fruity apple cider vinegar, this recipe creates a smooth rounded sour base. The generous amount of sugar softens the tangy hit, creating a mouthwatering sweet and sour harmony that enhances the natural flavor of any vegetable you preserve.
Warm Aromatic Spice Complex
The carefully chosen blend of whole and ground spices elevates this pickling liquid far above ordinary recipes. The cinnamon stick, whole cloves, and ground allspice introduce cozy warm notes that evoke nostalgic feelings of home style cooking. At the same time, the mustard seeds and celery seeds add a classic earthy crunch, while the red pepper flakes deliver a very subtle kick of warmth that keeps every bite exciting.
Beautiful Golden Appearance
Thanks to the addition of ground turmeric, this brine cooks up into a gorgeous vivid yellow golden color. When poured over green cucumbers, pale onions, or bright peppers, the vibrant liquid makes your home canned jars look like professional gourmet products. They look amazingly attractive sitting on your pantry shelves or displayed on a gift table for loved ones.
Health and Fitness Benefits
Preserving vegetables in a spiced vinegar liquid is a fantastic way to support a healthy lifestyle. Vinegar is known to aid healthy digestion, and spices like turmeric contain natural compounds that support wellness. Enjoying crunchy pickled vegetables allows you to satisfy savory snack cravings with real whole foods that are naturally low in fat, making it easy to stay on track with your physical fitness and wellness goals.
Extra Tips for Better Taste
Use Quality Fresh Vegetables
The final quality of your pickles depends heavily on the freshness of the produce you start with. Always select firm, freshly picked vegetables without soft spots, bruises, or signs of wilting. Crisp fresh vegetables absorb the rich spiced flavors of the brine much better and maintain a satisfying crunch long after canning.
Adjust the Spice Level Easily
If you love a spicy kick in your food, you can easily increase the amount of crushed red pepper flakes, or add a few slices of fresh jalapeno peppers into the jars with your vegetables. If you prefer a completely mild and sweet pickle, simply reduce or omit the red pepper flakes without affecting the safety or preservation quality of the recipe.
Let the Flavors Develop
While it can be very tempting to open a jar right away, patience pays off tremendously with canned pickles. Allow your sealed jars to rest in a cool dark pantry for at least one to two weeks before opening. This resting period gives the spiced liquid ample time to fully penetrate into the center of the vegetables, resulting in maximum flavor intensity.
Reuse Remaining Liquid Wisely
If you have extra liquid left over in your pot after filling your canning jars, do not throw it away. You can store leftover brine in a clean glass container in the refrigerator for up to two weeks. Use it as a quick quick pickling liquid for fresh sliced cucumbers, or splash it into salad dressings, marinades, and potato salads for an instant flavor upgrade.
Nutrition Details
Here is an estimated breakdown of the nutritional content for this sweet and spiced pickling liquid mixture. Please note that the actual amount of calories and nutrients absorbed by the vegetables will depend on how long they soak in the liquid and how much liquid is consumed with the final serving.
| Nutrient Component | Value per 20 ml Serving | Total Recipe Value |
| Total Calories | 35 kcal | 1800 kcal |
| Carbohydrates | 9 g | 450 g |
| Total Sugars | 8.5 g | 430 g |
| Dietary Fiber | 0.1 g | 5 g |
| Protein | 0.1 g | 3 g |
| Total Fat | 0.1 g | 3 g |
| Saturated Fat | 0 g | 0.2 g |
| Sodium | 5 mg | 120 mg |
| Potassium | 15 mg | 380 mg |
| Calcium | 8 mg | 210 mg |
| Iron | 0.2 mg | 4.5 mg |
Final Thoughts
Crafting your own sweet and tangy canning brine at home is a simple, fulfilling, and tasty way to preserve the fresh flavors of the season. With a harmonious blend of vinegars, warmth from whole spices, and a beautiful golden tint from natural turmeric, this recipe turns ordinary garden vegetables into extraordinary crispy treats. Whether you are stocking your own pantry or sharing homemade jars with friends, this pickling process brings pure joy to the kitchen. Give this easy method a try, experiment with your favorite fresh produce, and enjoy the wonderful satisfaction of eating real homemade food made with simple wholesome ingredients.
Disclaimer
This article and recipe are intended purely for informational and educational purposes. Everyone’s body, health conditions, and dietary needs are unique, so individual nutritional results may vary depending on personal health factors and specific preparation methods. When practicing home canning and food preservation, always ensure you strictly follow standard food safety guidelines, use proper acidity levels, and practice safe hygiene methods to prevent food spoilage. If you have specific dietary concerns, sodium restrictions, or underlying health issues, please consult with a qualified physician or registered dietitian before making significant changes to your diet.