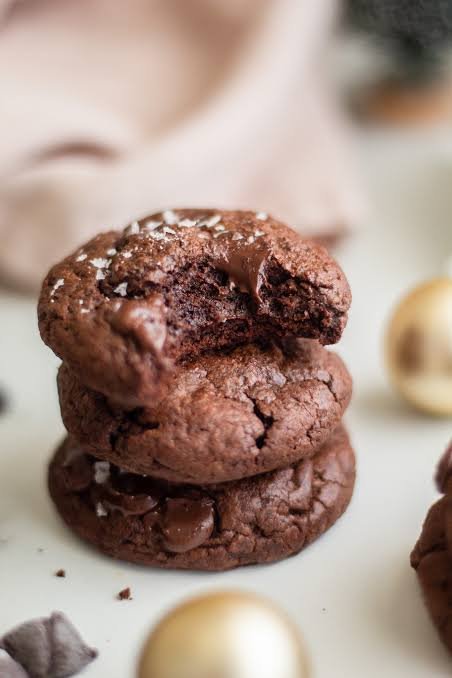
Fudgy chocolate brownie cookies are the ultimate dream for anyone who loves rich sweet treats and deep cocoa flavor. This recipe brings together two of the best desserts in the world into one single perfect bite. Imagine taking a soft rich chocolate brownie and turning it into a handy cookie that you can hold easily. You get a delicate shiny crinkly top on the outside and a super rich soft melting middle inside. When you bake these cookies, your home fills with a wonderful warm smell that makes everyone instantly hungry and happy. Cooking them is very easy, which makes this recipe a giant favorite for both complete kitchen beginners and experienced home bakers. You do not need any fancy cooking tools or hard techniques to achieve an amazing bakery style result right in your own oven. Every bite gives you a deep chocolate explosion that feels warm, comforting, and deeply satisfying for your soul.
People all around the world love this sweet recipe because it gives you pure happiness in every single bite. The texture is the secret magic here because it is not dry like a plain biscuit and not messy like a wet cake. It sits in that sweet perfect middle zone where soft fudge meets a light crispy edge. Kids adore these treats after school, while adults enjoy them with a hot cup of coffee or a cold glass of fresh milk. They are perfect for sharing with friends because almost nobody can say no to a homemade chocolate cookie. Bringing a box of these fresh baked goodies to a party or a family gathering immediately makes you the most popular person in the room. They look beautiful on a plate, smelling sweet and showing off that shiny cracked top surface that everyone loves to see.
There are so many wonderful times when making this recipe feels like the absolute best idea for your day. You can bake them when you have a hard stressful week and simply need a sweet comforting reward to boost your mood. They are also wonderful for weekend family baking sessions where kids can help mix the bowl and watch the dough transform. If you care about fitness, you can still enjoy these cookies by using dark chocolate with high cocoa and quality butter in moderate portion sizes. Dark chocolate contains natural antioxidants that can support heart health and lift your mood when eaten wisely. Making your own sweet treats at home lets you control every single ingredient, avoiding artificial chemicals and bad preservatives found in shop items. Feeding your body honest homemade ingredients always feels better and tastes much cleaner than factory food.
Starting your journey into home baking with this easy recipe will build your confidence in the kitchen very fast. You do not have to worry about complicated steps or confusing cake decorator tools when making these treats. Everything mixes together in just a couple of bowls using standard everyday utensils you already own in your kitchen drawers. The process is smooth, relaxing, and very rewarding when you see the shiny cookies come out hot from the oven. Baking is a wonderful way to slow down, clear your mind, and focus on creating something delicious for the people you love. Once you master this simple base recipe, you will want to make it again and again for every holiday, birthday, or cozy rainy evening.
Ingredients You Will Need
Gather all these fresh items on your kitchen counter before you begin mixing your sweet dough. Having everything measured out ahead of time makes the baking process smooth, clean, and fun.
-
Dark chocolate chips or chopped baking chocolate: 200 grams
-
Unsalted butter: 115 grams or half a cup
-
Granulated white sugar: 100 grams or half a cup
-
Packed light brown sugar: 100 grams or half a cup
-
Large fresh eggs at room temperature: 2 pieces
-
Pure vanilla extract: 5 milliliters or 1 teaspoon
-
All purpose flour: 125 grams or 1 cup
-
Natural unsweetened cocoa powder: 25 grams or a quarter cup
-
Baking powder: 3 grams or half a teaspoon
-
Fine sea salt: 2 grams or a quarter teaspoon
-
Extra chocolate chips for topping: 50 grams
Step by Step Method
Preparing Your Kitchen and Baking Equipment
Start by setting your kitchen oven temperature to 180 degrees Celsius or 350 degrees Fahrenheit. Let the oven heat up completely so your cookies bake evenly from the moment they go inside. Take two large metal baking sheets and cover them with sheets of brown parchment paper. This paper stops the sweet dough from sticking to the hot metal pan and makes cleaning up super easy later. Set your prepared pans aside on your clean counter while you work on the dough mixture.
Melting the Chocolate and Butter
Find a medium glass bowl that can safely handle heat in your kitchen. Put your dark chocolate chips and your cut pieces of unsalted butter into this bowl. Place the bowl over a small pot of gently simmering water on your stove, making sure the bottom of the bowl does not touch the hot water. Stir the butter and chocolate continuously using a silicone spatula until everything melts into a smooth glossy dark liquid. Remove the bowl safely from the heat and set it aside for five minutes so it can cool down slightly.
Beating the Eggs and Sugars for the Shiny Crust
Take a large mixing bowl and crack in your two room temperature eggs. Add the granulated white sugar and the packed light brown sugar into the bowl with the eggs. Use an electric hand mixer on high speed to beat the eggs and sugars together for four full minutes. The mixture will slowly change from dark yellow to a very pale thick cream color that holds soft ribbons. This long mixing step is the grand secret that creates that iconic shiny paper thin crinkly top on your finished cookies.
Combining the Wet Ingredients
Gently pour your cooled liquid chocolate and butter mixture into the bowl containing your pale fluffy whipped eggs. Pour in your pure vanilla extract at this same time to add a rich background aroma. Use a light hand and fold everything together slowly using your spatula so you do not knock out all the air you just whipped into the eggs. Keep folding gently from the bottom of the bowl to the top until the color looks uniform, dark, and smooth.
Sifting and Adding the Dry Ingredients
Place a wire mesh strainer or flour sifter over your wet chocolate bowl mixture. Measure your all purpose flour, natural cocoa powder, baking powder, and fine sea salt directly into the sifter. Tap the side of the sifter gently so all the dry powders fall into the bowl without any hard lumps. Sifting removes small flour clumps and ensures your cookie dough turns out completely smooth and velvety.
Mixing the Final Cookie Batter
Use your spatula to fold the dry ingredients gently into the wet chocolate mixture. Stop mixing the very second you see the white flour disappear into the dark chocolate batter. Over mixing the dough at this stage can make your cookies tough instead of soft and fudgy. Your cookie batter will look somewhat thin and glossy, more like a thick cake batter than a stiff standard cookie dough. Let the batter rest undisturbed on your kitchen counter for ten minutes so it can thicken up naturally.
Scooping onto Baking Sheets
Use a medium ice cream scoop or two dinner spoons to drop round balls of batter onto your prepared baking sheets. Leave about five centimeters of open space between each round portion because the cookies will spread out as they heat up in the oven. Press a few extra chocolate chips gently on top of each wet dough round for a beautiful bakery look.
Baking to Fudgy Perfection
Slide your filled baking sheets into the center rack of your fully heated oven. Bake the cookies for nine to eleven minutes total, keeping a close eye on them near the end. The edges of the cookies should look set and dry, while the centers will still look soft and slightly wet. Do not over bake them or they will lose their soft fudgy texture and turn dry like standard biscuits.
Cooling and Setting
Carefully remove the hot baking sheets from your oven using thick oven mitts. The hot cookies will be very soft and fragile right now, so do not try to move them immediately. Let the cookies sit on the hot baking sheet for ten full minutes to firm up safely. After ten minutes, use a flat spatula to move the cookies onto a wire cooling rack so they can cool down completely to room temperature.
Why This Recipe Is Special
This chocolate cookie recipe stands out from basic cookie recipes because it combines two totally different sweet worlds into one fantastic treat. You enjoy the deep rich intense flavor of an old fashioned brownie combined with the portability and quick baking time of a classic cookie. The balance between the light crispy edge and the soft melting middle gives your tongue an amazing texture experience that keeps you coming back for another bite.
From a health and wellness perspective, making these treats at home offers clear benefits over store bought factory cookies. You get complete control over the quality of your ingredients, allowing you to use real farm eggs, fresh butter, and real cocoa. Dark chocolate contains natural plant compounds called flavonoids that can support blood flow and help lower your daily stress levels. Cocoa powder also contains good minerals like iron, magnesium, and zinc that support your body strength and general energy.
Eating a rich chocolate treat also triggers the release of happy chemicals in your brain like serotonin and endorphins. Enjoying a homemade cookie in moderation fits nicely into a balanced life where you nourish both your body and your emotional well-being. Knowing exactly what goes into your food gives you peace of mind, free from artificial colors, fake flavors, or hydrogenated oils.
Extra Tips for Better Taste
To take your chocolate brownie cookies to an even higher level of flavor, try these easy creative tips in your kitchen. First, add half a teaspoon of instant espresso coffee powder to your melted chocolate mixture. The coffee flavor will not make the cookies taste like coffee at all, but it dramatically deepens and amplifies the natural chocolate taste.
Another great trick is sprinkling a few flakes of coarse sea salt over the top of each cookie right after they come out of the hot oven. The tiny salty crystals cut through the rich sweetness and make the chocolate flavor pop in your mouth. You can also mix in half a cup of chopped walnuts or pecans if you enjoy a nice crunchy contrast inside your soft fudgy cookies.
Always make sure your eggs are at warm room temperature before you start whipping them with the sugars. Cold eggs from the fridge will cause your warm melted chocolate to seize up and harden, which ruins the silky texture of your dough. If you forget to take your eggs out early, simply submerge them in a bowl of warm tap water for five minutes before cracking them open.
Nutrition Details
Here is the nutritional breakdown for these homemade chocolate brownie cookies. Keep in mind that exact numbers can change slightly depending on the specific brands of butter and chocolate you buy at your local grocery store.
Recipe Overview and Serving Size
-
Total preparation time: 15 minutes
-
Total cook time: 10 minutes
-
Rest time: 10 minutes
-
Total yield: 12 large cookies
-
Serving size: 1 cookie
Nutritional Information Per Serving
| Nutrients | Amount Per Serving | Daily Value Percentage |
| Calories | 210 kcal | 10% |
| Total Fat | 11 grams | 14% |
| Saturated Fat | 6 grams | 30% |
| Trans Fat | 0 grams | 0% |
| Cholesterol | 35 milligrams | 12% |
| Sodium | 65 milligrams | 3% |
| Total Carbohydrates | 26 grams | 9% |
| Dietary Fiber | 2 grams | 7% |
| Total Sugars | 18 grams | 36% |
| Protein | 3 grams | 6% |
| Calcium | 20 milligrams | 2% |
| Iron | 1.8 milligrams | 10% |
| Potassium | 120 milligrams | 3% |
Final Thoughts
Baking these fudgy chocolate brownie cookies is a fun, warm, and rewarding activity that brings genuine joy into your kitchen. The simple ingredients turn into something truly extraordinary through the magic of basic home cooking techniques. Whether you are baking a sweet surprise for your family, hosting a party with friends, or simply treating yourself after a long busy week, this recipe never fails to deliver big smiles. Grab your mixing bowl, turn on your oven, and enjoy every single rich bite of these wonderful homemade treats.
Disclaimer
The health and nutrition information provided in this article is meant for general educational purposes only and should not replace professional medical advice. Everyone has a unique body with different calorie needs, dietary sensitivities, and health conditions, so individual nutritional results may vary. If you have specific dietary restrictions, food allergies, diabetes, or health concerns, please consult with a qualified doctor or registered dietitian before making changes to your regular diet.