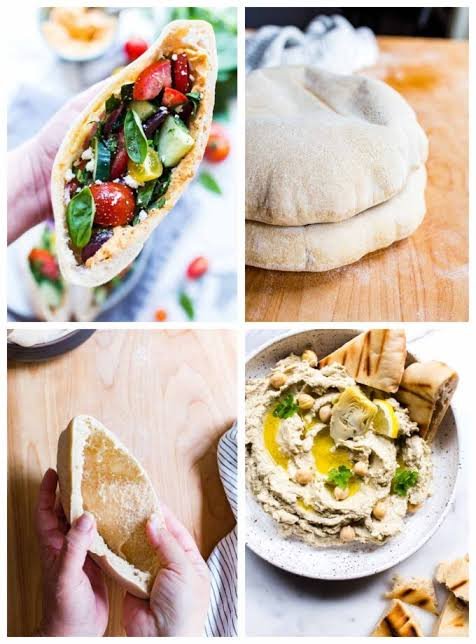
Making homemade bread at home brings a very warm feeling to the entire house and creates a wonderful smell that stays in your kitchen for hours. Today we are going to learn how to make fresh pita bread using a traditional sourdough starter that ferments slowly overnight while you sleep peacefully. Sourdough pita bread is a soft round flatbread that puff up in the oven or on a hot stove top to create a hollow pocket inside every piece. This hollow pocket makes pita bread perfect for filling with your favorite lunch meats fresh vegetables grilled chicken or homemade hummus spreads. When you bake this bread at home you get total control over all the simple wholesome ingredients that go directly into your body without any artificial preservatives or bad chemicals. Sourdough baking might sound difficult to a beginner but flatbreads like pita are actually one of the easiest sourdough recipes you can start with today because they are very forgiving and easy to shape.
Many people across the world fall in love with sourdough pita bread because the slow overnight fermentation creates a deep rich flavor that regular store bought bread can never match. Store bought flatbreads are often dry pale and stiff because factory machines produce them quickly using fast acting commercial yeast and extra processing agents. Homemade sourdough pita bread stays wonderfully soft pillowy and flexible because natural wild yeast and friendly lactic acid bacteria break down the flour over many hours. Every single bite offers a subtle tangy flavor coupled with a chewy texture that makes simple meals feel like special restaurant experiences right at your dinner table. Kids and adults alike enjoy watching the dough rounds puff up big like little brown balloons inside a hot oven or skillet. That magic moment when the dough expands and creates a natural inner pocket brings pure joy to anyone who loves cooking fresh food at home for their family.
You should consider making this delicious recipe whenever you want to upgrade your meal prep routine for the upcoming week or when you host a weekend gathering with good friends. From a health and fitness viewpoint sourdough bread is much easier on your stomach than fast yeast bread because the overnight fermentation process breaks down tough gluten proteins and natural antinutrients. People who often feel bloated after eating standard white bread usually discover that authentic long fermented sourdough is much gentler on their digestive system. Beyond health benefits making sourdough flatbread is a wonderful stress relief activity that connects you with traditional cooking practices passed down through many generations. Taking a few simple ingredients like flour water salt and starter and turning them into golden puffed breads gives you a great feeling of pride and satisfaction. Sharing hot fresh bread straight from your oven creates warm happy memories around your dining table that bring people closer together.
Starting your overnight sourdough journey requires only a small amount of basic hands on preparation work during the evening before you go to sleep. You mix your dough ingredients together in a clean bowl stretch it a couple of times to build gluten strength and then leave it sitting at cool room temperature through the entire night. While you rest peacefully the wild yeast inside your starter slowly produces tiny gas bubbles while natural enzymes break down complex starches into sweet rich flavors. By the time morning arrives your dough is fully fermented soft and ready to be divided into small equal portions for rolling. Baking the individual flatbreads takes only two or three minutes per piece on a very hot skillet or baking stone so you can enjoy fresh warm bread for breakfast or early lunch. Once you master this simple process you will rarely want to purchase packaged bread from the grocery store ever again.
Ingredients You Will Need
To prepare this rich long fermented sourdough pita bread you need only five basic kitchen ingredients that you probably already have inside your pantry. Measuring your ingredients accurately using a digital kitchen scale will help you get identical perfect results every single time you bake.
Active Sourdough Starter
-
100 grams active sourdough starter fed and bubbly
Bread Flour or All Purpose Flour
-
400 grams unbleached bread flour or high protein all purpose flour
Lukewarm Water
-
250 grams warm water filtered and free of chlorine
Fine Salt
-
8 grams fine sea salt or kosher salt
Olive Oil
-
15 grams extra virgin olive oil plus extra for greasing your bowl
Step by Step Method
Making sourdough pita bread at home is very straightforward when you follow these easy steps in order. Take your time and enjoy each stage of the bread making process.
Step 1 Mixing The Dough
In a large clean glass or ceramic mixing bowl pour in your warm water and your active bubbly sourdough starter. Use a spoon or a whisk to mix the water and starter together until the liquid looks milky and white. Next add the unbleached bread flour fine sea salt and extra virgin olive oil into the liquid mixture. Use a sturdy wooden spoon or your clean hands to mix everything together until all the dry flour disappears into a shaggy wet dough ball. Cover the bowl with a clean damp kitchen towel or plastic wrap and let the dough rest undisturbed for thirty minutes so the flour can fully absorb the water.
Step 2 Kneading And Stretching
After thirty minutes remove the cover from your bowl to begin strengthening the dough. Reach down to the bottom of the bowl grab one side of the dough lift it upward gently without tearing it and fold it over into the center of the dough mass. Rotate your bowl ninety degrees and repeat this stretch and fold action on all four sides of the dough ball. Perform two more sets of stretch and folds spaced fifteen minutes apart. You will notice that the dough transforms from a rough shaggy mass into a smooth elastic ball that feels nice to touch.
Step 3 Overnight Bulk Fermentation
Shape your dough into a neat round ball and place it back inside your lightly oiled mixing bowl. Cover the bowl tightly with plastic wrap or a secure lid to stop the outer surface of the dough from drying out during the night. Place the bowl on your kitchen counter at cool room temperature for eight to twelve hours overnight. During these long hours the wild yeast will slowly rise the dough to roughly double its original size while developing delicious natural tangy sourdough flavors throughout the entire mass.
Step 4 Dividing The Dough
The next morning check your dough to ensure it looks soft airy and full of small gas bubbles inside. Gently tip the fermented dough out onto a lightly floured clean kitchen counter or wooden board. Using a bench scraper or a sharp knife divide the large dough into eight equal pieces weighing around one hundred grams each. Take each individual piece of dough pull the edges into the center and roll it under your palm to form a tight smooth round ball. Place all eight dough balls on a tray cover them loosely with a damp towel and let them rest for twenty minutes so the gluten relaxes.
Step 5 Rolling The Pita Rounds
Dust your kitchen work surface and rolling pin with a little bit of extra flour. Take one rested dough ball and gently flatten it with your fingertips into a small round disk. Use your rolling pin to roll the disk into an even circle about six inches wide and one quarter inch thick. Be careful to roll evenly from the center outward so the dough has a uniform thickness without thin spots or tears. Roll out all your dough balls into flat circles and keep them covered under a clean towel so they stay moist while your cooking surface heats up.
Step 6 Baking Your Pita Bread
Preheat your oven with a heavy baking stone or cast iron skillet placed inside on the top rack to four hundred seventy five degrees Fahrenheit or two hundred forty five degrees Celsius for at least thirty minutes. High heat is the absolute secret to getting a big air pocket inside your flatbread. Carefully transfer one flat dough round onto the extremely hot stone or skillet inside your oven. Close the oven door immediately and bake for two to three minutes until the dough swells up big like a balloon and shows light golden spots. Remove the hot puffed pita using metal tongs and stack it inside a folded clean kitchen towel. Wrap the warm breads inside the towel immediately so the escaping steam softens the crust. Repeat this cooking process with all remaining dough rounds.
Why This Recipe Is Special
This overnight sourdough pita bread recipe stands out because it combines incredible traditional flavor with amazing health benefits for your body. Commercial breads rely on fast fermentation that leaves tough starches and proteins intact which often causes stomach discomfort for many people. The long overnight fermentation in this recipe gives natural probiotic microbes enough time to pre digest the flour making nutrients like iron zinc and magnesium much easier for your body to absorb.
Another reason this recipe is special is its amazing physical texture. Factory flatbreads are often dry brittle and prone to tearing when you try to fold them or stuff them with food. This sourdough version stays super soft fluffy and flexible for days after baking. The natural acidity created by wild sourdough bacteria acts as a natural preservative so your homemade bread stays fresh longer without any chemical additives or synthetic softeners.
| Feature | Overnight Sourdough Pita | Store Bought Commercial Pita |
| Fermentation Time | 8 to 12 Hours | 30 to 60 Minutes |
| Ingredients Used | 5 Simple Whole Food Items | 15 Plus Processing Agents |
| Gut Friendliness | Very Easy To Digest | Can Cause Bloating |
| Texture | Pillowy Soft And Flexible | Stiff Dry And Brittle |
| Flavor Profile | Deep Rich Tangy Flavor | Bland One Dimensional Taste |
Extra Tips For Better Taste
To make your sourdough pita bread taste even more amazing you can experiment with a few simple culinary tricks. Brush the tops of your hot baked pita flatbreads with fresh garlic butter or extra virgin olive oil as soon as they come out of the oven. Sprinkle dried oregano coarse sea salt sesame seeds or zaatar spice mix over the oiled surface to add extra aroma and crunch.
If you enjoy whole grain goodness you can replace one hundred grams of the white flour with fresh stone ground whole wheat flour or rye flour. This adjustment gives your pita bread a deeper nutty flavor and extra dietary fiber while keeping the inner texture soft. Another great trick is adding a teaspoon of pure raw honey into the dough liquid during step one to create a very subtle sweet balance that pairs wonderfully with the natural sourdough tang.
Always store your completely cooled sourdough pita flatbreads inside an airtight food storage container or zip top bag at room temperature. If you have leftover breads that you cannot finish within three days wrap them tightly in foil and store them inside your freezer for up to three months. To reheat frozen pita bread simply place it directly onto a hot dry pan or inside a warm oven for two minutes until it becomes soft warm and flexible again.
Final Thoughts
Baking fresh sourdough pita bread at home is a deeply rewarding culinary habit that fills your house with lovely smells and brings real nourishing food to your daily family table. This simple overnight process requires very little active work because time does all the heavy mixing and fermenting for you while you sleep. Once you experience the unbelievable difference in taste softness and digestibility between store bought bread and fresh homemade sourdough flatbread you will feel inspired to keep your sourdough starter alive and active for life. Grab your simple ingredients tonight mix your dough in a bowl and look forward to waking up tomorrow morning to the delicious joy of fresh hot sourdough pita bread straight from your own kitchen.
Nutrition Details
Below is the estimated nutrition breakdown per serving based on a total recipe yield of eight individual sourdough pita flatbreads.
Recipe Yield Details
-
Total Servings 8 individual pita breads
-
Serving Size 1 pita bread approx 85 grams cooked weight
-
Preparation Time 20 minutes active work
-
Fermentation Time 8 to 12 hours overnight
-
Baking Time 20 minutes total
| Nutrient Name | Value Per Serving | Daily Percentage |
| Total Calories | 215 kcal | 11 percent |
| Carbohydrates | 41 grams | 15 percent |
| Dietary Fiber | 2 grams | 8 percent |
| Sugars | 1 gram | 2 percent |
| Protein | 7 grams | 14 percent |
| Total Fat | 2.5 grams | 3 percent |
| Saturated Fat | 0.4 grams | 2 percent |
| Sodium | 390 mg | 17 percent |
| Potassium | 75 mg | 2 percent |
| Iron | 2.2 mg | 12 percent |
Disclaimer
The nutritional values provided in this article are simple estimates calculated based on standard ingredient database measurements. Exact nutritional content may vary depending on the specific flour brands you purchase your sourdough starter activity level and slight variations in individual portion sizes. This recipe article is shared for general cooking education and home culinary enjoyment only. Every human body is unique with distinct dietary needs health conditions and digestive sensitivities. Always consult with a qualified medical professional or certified nutritionist if you have specific dietary concerns health conditions or severe gluten intolerances before changing your eating habits.