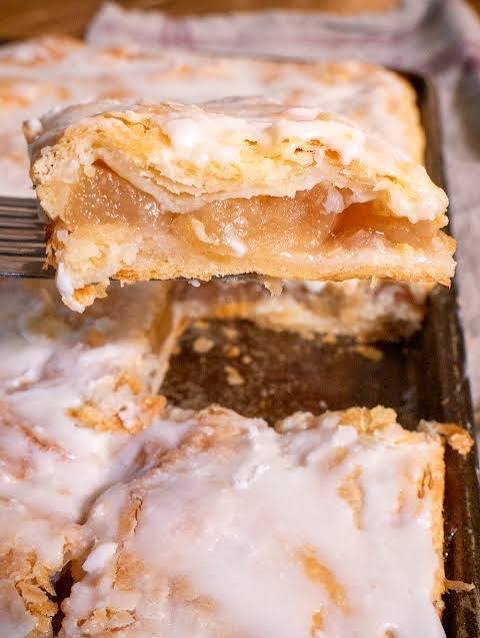
Chicago style bakery apple slices are one of the most beloved traditional treats born out of classic Midwest bakeries. If you have ever walked into an old school bakery in Chicago, you probably noticed huge glass display cases filled with rows of golden baked goods. Among all the colorful frosted cakes and flaky croissants, these humble rectangular pastry squares always manage to steal the spotlight. They feature a buttery shortbread base covered with sweet spiced apples and topped with a lovely crust or simple sweet glaze. People love this recipe because it combines the best elements of a classic apple pie with the convenience of a portable bar dessert. Making them at home brings that nostalgic bakery smell right into your kitchen, filling your whole house with warm cinnamon and sweet baked fruit aromas.
The reason so many families hold this specific recipe close to their hearts comes down to its incredible balance of texture and taste. Unlike traditional round pies that can sometimes end up with soggy bottom crusts, these apple slices stay remarkably sturdy thanks to their dense shortbread style crust. Every bite gives you a soft crunch from the pastry combined with a tender, juicy fruit center that melts in your mouth. Children love helping out in the kitchen when making this dish because the dough is super easy to handle and shape into the pan. It is also an amazingly budget friendly treat since the main ingredients are basic kitchen staples like fresh apples, flour, butter, and warm spices. You do not need any fancy cooking tools or advanced baking skills to achieve a result that tastes just like it came from a professional shop.
There are countless perfect moments throughout the year to bake a batch of these comforting apple bars for your loved ones. Fall is obviously a wonderful season for this dessert because fresh apples are at their peak sweetness, but it works equally well during any month. You can bake them for weekend family gatherings, neighborhood potlucks, school bake sales, or simple holiday desserts after a cozy dinner. From a mood perspective, baking this dish is a wonderful way to relax after a busy week because the process of slicing apples and mixing dough feels grounded and soothing. Even people watching their fitness goals can enjoy this treat in moderation because apples are naturally packed with dietary fiber and healthy nutrients. You can easily adjust the added sugar content in the fruit filling without losing any of the fantastic traditional flavors.
Mastering this recipe will quickly make you the most popular host among your group of friends and family members. Leftovers store incredibly well in the fridge, meaning you can meal prep these sweet bars ahead of time for quick weekday snacks or late night cravings. They taste wonderful when served cold directly from the refrigerator, but warming them up slightly in the microwave makes them feel like a fresh bakery item. Pairing a warm pastry square with a scoop of vanilla bean ice cream creates an absolute dessert masterpiece that will impress anyone. Once you see how simple the whole process is from start to finish, you will want to skip the store bought versions permanently. This detailed guide will show you every single step needed to craft perfect Chicago style bakery apple slices right in your home oven.
Ingredients You Will Need
For the Pastry Crust and Topping:
-
4 cups all purpose flour
-
1 cup unsalted butter, softened to room temperature
-
1 half cup granulated white sugar
-
2 large egg yolks
-
1 cup cold milk
-
1 teaspoon vanilla extract
-
1 half teaspoon salt
For the Sweet Apple Filling:
-
8 large crisp apples, peeled, cored, and sliced thin
-
1 cup granulated white sugar
-
2 tablespoons all purpose flour
-
1 tablespoon ground cinnamon
-
1 quarter teaspoon ground nutmeg
-
1 tablespoon fresh lemon juice
For the Sweet Sugar Glaze:
-
1 cup powdered sugar
-
2 tablespoons whole milk
-
1 half teaspoon vanilla extract
Step by Step Method
Step 1: Preparing Your Kitchen and Baking Pan First, turn on your oven and set the temperature to 350 degrees Fahrenheit so it has plenty of time to warm up completely. Take a standard 9 by 13 inch baking pan and light grease the bottom and sides with a little bit of butter or vegetable oil spray. You can also line the pan with parchment paper if you want to lift the entire batch of pastry squares out easily after baking. Setting up your workspace with all your measured ingredients before starting will make the whole process smooth and stress free.
Step 2: Making the Rich Pastry Dough In a large mixing bowl, combine your four cups of all purpose flour, half cup of granulated white sugar, and half teaspoon of salt. Cut your softened unsalted butter into small pieces and add them into the flour mixture. Use your clean hands or a pastry blender to mix the butter into the flour until it looks like coarse breadcrumbs. In a separate small bowl, whisk together the two egg yolks, one cup of cold milk, and one teaspoon of vanilla extract. Pour the liquid mixture into your flour mixture and gently stir until a soft dough forms. Divide the dough into two equal halves, wrap them in plastic wrap, and let them rest in the fridge for 15 minutes.
Step 3: Preparing the Tasty Apple Filling While your pastry dough is resting in the refrigerator, turn your attention to the fruit filling. Wash, peel, and core your eight large crisp apples, then cut them into thin, uniform slices. Place all the sliced apples into a very large mixing bowl. Add one cup of granulated sugar, two tablespoons of flour, one tablespoon of ground cinnamon, one quarter teaspoon of ground nutmeg, and one tablespoon of fresh lemon juice over the fruit. Toss everything together thoroughly using a large spoon until every single apple slice is evenly coated with the sweet spice mixture.
Step 4: Assembling the Bottom Layer Take one half of your chilled dough out of the refrigerator and place it onto a lightly floured flat surface. Use a rolling pin to roll the dough out into a rectangle that matches the size of your prepared 9 by 13 inch pan. Carefully transfer the rolled dough into the bottom of your greased pan, pressing it gently into the corners and slightly up the sides. Pour your sweet cinnamon apple filling directly on top of this bottom crust, spreading the fruit out evenly with a spatula so the layer is completely flat.
Step 5: Adding Top Layer and Baking Roll out the second half of your dough on your floured surface until it is large enough to cover the top of your apple filling. Lift the top crust carefully and place it right over the apple layer. Pinch the edges of the top crust and bottom crust together along the sides to seal all that juicy fruit inside. Use a small sharp knife to poke a few small air vents into the top crust so steam can escape while cooking. Place the pan in your preheated oven and bake for roughly 45 to 50 minutes until the top crust turns a beautiful light golden brown color.
Step 6: Glazing and Serving Remove the pan from your oven and let it cool down on your counter for about 20 minutes. While it cools slightly, whisk together your powdered sugar, milk, and vanilla extract in a small bowl until smooth. Drizzle this sweet white glaze all over the warm top crust. Allow the pastry to cool down completely so the fruit layer sets properly and the glaze hardens. Cut the baked treat into neat square slices and serve to your eager family members.
Why This Recipe Is Special
This traditional recipe holds a special place in the baking world because it brings professional quality flavors into everyday home kitchens without complicated techniques. The unique combination of a tender, biscuit like shortbread crust with a soft, spiced fruit center makes every bite unforgettable. Unlike modern fast desserts that rely on processed shortcut ingredients, this recipe uses real wholesome foods like fresh apples, pure butter, and aromatic spices. Cooking fresh fruit inside a closed pastry seal locks in all the natural juices, creating an incredible flavor depth that canned pie fillings simply cannot match.
From a health perspective, making your own baked goods at home allows you to take full control over what goes into your body. Apples are filled with beneficial dietary fiber, vitamin C, and natural antioxidants that support strong digestion and overall wellness. Cinnamon is well known for its positive health qualities, including helping maintain steady blood sugar levels and providing natural anti inflammatory benefits. By controlling the amount of added refined sugar in the crust and filling, you can easily create a lighter treat that satisfies sweet cravings without feeling overly heavy.
Another reason this recipe is so extraordinary is its amazing practical convenience for feeding large groups of people. A single 9 by 13 inch baking pan yields a generous number of individual dessert bars that are sturdy enough to be eaten by hand. You do not need plates or forks to enjoy these slices, which makes them ideal for outdoor picnics, birthday parties, or school events. The bars hold their shape remarkably well at room temperature, making transport easy and clean compared to messy traditional pies.
Extra Tips for Better Taste
To make your bakery apple slices taste even more extraordinary, consider mixing different types of apples together in your filling. Combining sweet red apples with slightly tart green apples creates a wonderfully balanced flavor profile that elevates the entire dish. Slicing your fruit thin and evenly ensures that every bite cooks at the exact same rate, preventing any hard unbaked fruit spots in your final bars.
Adding a tiny sprinkle of coarse sea salt over your glaze right after drizzling can create a gorgeous salty sweet contrast that highlights the rich butter in the crust. If you love warm flavors, feel free to add a pinch of ground ginger or ground cloves along with your cinnamon. Always let the baked pan cool down fully to room temperature before slicing, as cutting into hot pastry bars will cause the warm filling to run out instead of holding nice clean square edges.
Final Thoughts
Baking your own Chicago style bakery apple slices is a deeply rewarding kitchen experience that brings joy to both the baker and everyone lucky enough to enjoy a slice. The simple steps, affordable wholesome ingredients, and nostalgic aroma make this classic dessert a true winner for any household. Whether you are baking for a special holiday celebration or just spoiling your family on a lazy Sunday afternoon, these sweet bars will bring smiles around your table. Grab your rolling pin, gather some fresh apples, and enjoy creating your own batch of pure bakery magic today.
Nutrition Details
Here is an estimated nutritional breakdown for this recipe, assuming the full batch is divided into 15 equal serving slices.
Nutritional Breakdown Per Serving:
-
Calories: 320
-
Total Fat: 13 grams
-
Saturated Fat: 8 grams
-
Trans Fat: 0 grams
-
Cholesterol: 50 milligrams
-
Sodium: 110 milligrams
-
Total Carbohydrates: 48 grams
-
Dietary Fiber: 3 grams
-
Sugars: 26 grams
-
Protein: 4 grams
Component Comparison Table:
-
Component: Pastry Dough Layer
-
Key Nutrients Provided: Complex Carbohydrates, Calcium, Energy
-
Primary Purpose: Provides sturdy structure and rich butter flavor
-
Component: Spiced Apple Layer
-
Key Nutrients Provided: Dietary Fiber, Vitamin C, Antioxidants
-
Primary Purpose: Adds juicy natural sweetness and warm aromatic spice
-
Component: Sweet Sugar Glaze
-
Key Nutrients Provided: Quick Energy, Simple Sugars
-
Primary Purpose: Adds attractive visual shine and instant sweet taste
Disclaimer
The nutritional values provided in this article are approximate estimates based on standard ingredients and average serving sizes. Individual nutritional outcomes may vary depending on the specific product brands you select, exact measurement techniques, or modifications made to the original recipe. Everyone has unique dietary requirements, health conditions, and personal fitness goals. If you have specific dietary restrictions, food allergies, or medical concerns, please consult with a qualified health professional or registered dietitian before making significant changes to your regular meal plan.