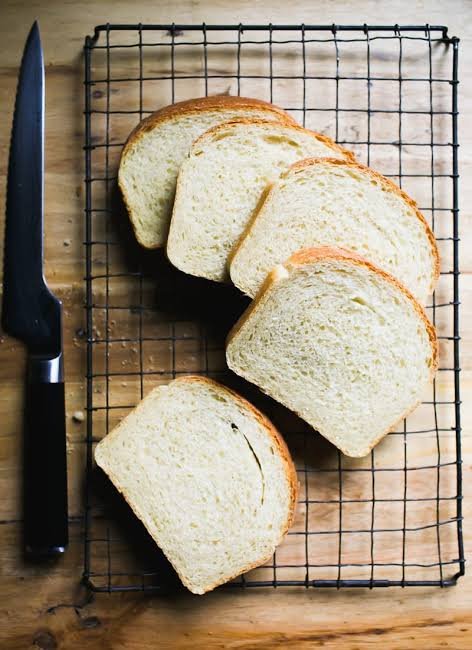
Making soft sourdough sandwich bread at home is one of the most rewarding baking projects you can ever try in your kitchen. Many people think that baking sourdough requires a lot of technical skill or special tools, but this simple recipe is designed to help anyone create a super soft and fluffy loaf using basic kitchen ingredients. Traditional sourdough can sometimes turn out very chewy with a super hard outer crust, which is great for artisan loaves, but it is not always ideal for daily breakfast toast or kid lunchbox sandwiches. This specific recipe focuses on creating a tender crumb and a soft top crust that slices easily without crumbling all over your counter. By combining a active sourdough starter with a touch of milk, fat, and sweet honey, you get the absolute best of both worlds in every single slice. You get the rich depth of flavor from natural fermentation alongside the pillow soft texture of standard bakery sandwich bread. Cooking this way brings pure joy to your home because your whole kitchen fills with the warm, comforting scent of fresh baked goodness.
People completely fall in love with this recipe because it delivers incredible texture and consistency every single time you bake it. If you have ever tried making traditional sourdough before, you might have felt frustrated by giant air holes that let your butter, jam, or sandwich spreads leak right through onto your hands. This soft sourdough sandwich loaf solves that exact problem by giving you a uniform, light, and tight structure that holds ingredients perfectly while remaining incredibly gentle to bite into. Kids love it because it does not hurt their teeth, and adults love it because it brings back sweet nostalgic memories of old fashioned homemade bakery bread. The naturally gentle sour taste is balanced out so nicely by the subtle sweetness of milk and honey, making it an instant favorite for even the pickiest eaters in your house. Once your family tastes a warm slice straight out of the oven, they will likely ask you to stop buying store bought packaged bread completely.
There are so many wonderful reasons to make this beautiful loaf, whether you are looking to improve your daily nutrition or simply want to enjoy a relaxing baking ritual over the weekend. Making your own bread from scratch allows you to take total control over every single ingredient that goes into your body, completely avoiding artificial preservatives, unnecessary dough conditioners, and refined seed oils. Sourdough fermentation breaks down complex starches and gluten naturally, which means this bread is generally much easier on your stomach and aids in smooth digestion compared to commercial yeast loaves. Eating a thick slice topped with fresh avocado, organic peanut butter, or warm melted cheese provides long lasting energy without causing a quick spike and crash in your blood sugar levels. Beyond the health perks, the physical act of mixing, kneading, and shaping dough serves as a fantastic form of natural stress relief after a long and busy week at work.
You can prepare this loaf whenever you want to bring an extra touch of warmth, love, and comfort into your weekly family routine. It is ideal for quiet Sunday mornings when you have a bit of free time to relax while the dough slowly rises on your kitchen counter. Packing sandwiches made from scratch for your family gives you a deep sense of pride, knowing you are feeding them wholesome food made with your own hands. It also makes a thoughtful and charming gift to bring to new neighbors, close friends, or family members who are recovering or celebrating a special life occasion. Whether you are aiming to eat cleaner, save money on your grocery bills, or just master a valuable kitchen skill, this approachable sourdough recipe fits seamlessly into your everyday life.
Ingredients You Will Need
active sourdough starter fed and bubbly, one half cup or one hundred twenty grams
lukewarm whole milk, one cup or two hundred forty grams
warm water, one half cup or one hundred twenty grams
unbleached bread flour, four cups or five hundred grams
pure honey or maple syrup, two tablespoons or forty grams
melted unsalted butter or olive oil, three tablespoons or forty two grams
fine sea salt, two teaspoons or ten grams
extra melted butter for brushing the top crust after baking, one tablespoon
Step by Step Method
To start this simple process, make sure your sourdough starter is fully active, bubbly, and has doubled in size in its jar. Take a large mixing bowl and pour in the warm water, warm milk, active sourdough starter, and honey. Stir these liquid ingredients together gently using a wooden spoon or a whisk until the starter completely dissolves and the liquid looks milky and smooth. Next, add the melted butter and stir once more to combine everything evenly.
Pour all of the bread flour and fine sea salt directly into the large mixing bowl with your liquid mixture. Use a sturdy spatula or your clean hands to mix the ingredients together until all the dry flour is fully hydrated and a shaggy dough forms. If the mixture seems a tiny bit too dry, you can add one teaspoon of warm water at a time, but try not to add too much extra flour. Cover the mixing bowl with a damp kitchen towel or a sheet of plastic wrap and let it sit quietly on your counter for thirty minutes to rest. This short resting period allows the flour to absorb the liquids fully and makes the dough much easier to handle later.
After the resting period is complete, it is time to stretch and fold the dough to build strength. Keep the dough inside the bowl, reach down to grab one edge of the dough, pull it upward gently, and fold it over the center toward the opposite side. Turn your bowl a quarter turn and repeat this exact stretching and folding action three more times until you have worked all around the circle. Repeat this stretch and fold process three separate times, waiting twenty minutes between each round. You will notice the dough changing from a rough, shaggy ball into a smooth, elastic, and soft dough.
Now it is time for the main first rise, which is often called the bulk fermentation stage. Cover your bowl tightly with plastic wrap or a wet cloth and leave it in a warm spot in your kitchen. Let the dough rise undisturbed for about six to eight hours, depending on how warm your room is. You will know it is ready when the dough increases in volume by roughly fifty to seventy percent, looks puffy, and shows small air bubbles around the top surface edges.
Prepare a standard nine by five inch bread loaf pan by rubbing a thin layer of butter all along the inside bottom and side walls. Lightly flour your clean kitchen counter and gently turn out the puffy dough onto the work surface. Press the dough gently with your fingertips to flatten it out into a flat rectangle shape that is about eight inches wide and twelve inches long.
To shape your sandwich loaf properly, fold the left third of the flat dough rectangle over into the middle, then fold the right third over top of that just like a letter. Starting from the short top edge closest to you, roll the dough up tightly into a firm log shape. Tucking the roll tightly as you go builds good surface tension, which helps the loaf rise up tall inside the oven rather than spreading out sideways. Place the shaped dough log seam side down into your prepared, buttered loaf pan.
Cover the loaf pan loosely with a clean towel and let it undergo its second rise. This stage takes roughly two to four hours at room temperature, or until the top of the dough rises about one inch above the rim of the metal loaf pan. If your kitchen is cool, this step can take a bit longer, so be patient and focus on how high the dough has risen rather than looking strictly at the clock.
Preheat your home oven to three hundred seventy five degrees Fahrenheit or one hundred ninety degrees Celsius so it gets nice and hot. Place the loaf pan onto the middle oven rack and bake for thirty five to forty minutes. The bread is fully baked when the top crust turns a beautiful deep golden brown color and the internal temperature reaches two hundred degrees Fahrenheit when checked with a digital probe thermometer.
Remove the hot bread pan safely from the oven using thick oven mitts and set it on a wire cooling rack. Immediately brush the warm top crust generously with one tablespoon of melted butter to keep it extra soft and shiny. Let the loaf cool inside the pan for ten minutes, then gently tip the pan sideways to release the loaf onto the wire rack to cool completely. Make sure you allow the bread to cool for at least two full hours before slicing, as slicing warm bread can make the inside gummy and wet.
Why This Recipe Is Special
This soft sourdough sandwich bread is truly unique because it completely bridges the gap between traditional artisan bread baking and everyday practical convenience. Standard sourdough relies strictly on flour, water, and salt, which creates an amazing dark crust and large open interior holes, but that texture can be tough for daily sandwiches or small kids. By introducing milk and butter into the dough mixture, we naturally soften the gluten structure and retain extra moisture inside the bread. The natural fat content protects the interior crumb from drying out fast, ensuring your homemade loaf stays tender for many days on your kitchen counter.
From a wellness perspective, long natural fermentation offers outstanding benefits for your digestive system compared to quick yeast breads. As the natural sourdough starter feeds on the starches in the flour over several hours, it breaks down complex carbohydrates and phytic acid, making essential minerals easier for your body to absorb. Many people who feel bloated or uncomfortable after eating commercial white bread find that traditional sourdough is much gentler on their stomachs. Furthermore, because you are baking at home, you eliminate all synthetic additives, artificial dough softeners, and chemical preservatives commonly found in grocery store bags.
The taste profile of this sandwich loaf is perfectly balanced and light enough for any meal. It delivers a very mild, pleasant tang that tastes rich and homemade without overpowering your favorite sandwich fillings. The small addition of natural honey or maple syrup cuts down any harsh sourness while encouraging a beautiful brown crust in the oven. It is simple enough to pair with salty savory turkey deli meat, yet sweet and buttery enough to enjoy plain with a cold glass of milk.
Extra Tips for Better Taste
If you want to take the flavor and texture of your soft sandwich loaf to the next level, there are several easy tricks you can use at home. Substituting half of the warm water with unsweetened full fat buttermilk adds a wonderful, subtle cultured tanginess and creates an even softer interior texture. You can also swap out the white bread flour for twenty percent whole wheat flour or rye flour if you enjoy a deeper, earthier nuttiness in your morning toast.
Pay close attention to room temperature, as sourdough starter reacts strongly to heat and cold. If your home is very cold during winter months, you can place your rising dough inside an turned off oven with the interior light switched on to create a warm mini environment. Conversely, if your summer kitchen is very hot, you can move the dough into the refrigerator overnight to slow down the fermentation process and develop richer, complex flavors.
For a visually gorgeous finished product, you can sprinkle simple toppings onto the top of the loaf right before it goes into the oven. Lightly brush the top of the risen dough with a tiny bit of water or milk, then scatter rolled oats, sesame seeds, poppy seeds, or sunflower seeds across the upper surface. This adds a nice crunch, extra nutrient value, and gives your homemade loaf a professional bakery look.
Storing your finished bread correctly is just as crucial as baking it properly. Keep the cooled loaf inside a linen bread bag or a loose paper bag for the first two days to preserve the soft crust texture. If you cannot finish the entire loaf within three or four days, slice the entire bread thinly, store the slices inside an airtight freezer bag, and toast individual slices straight from the freezer whenever you need fresh bread.
Final Thoughts
Baking a fresh loaf of soft sourdough sandwich bread is a simple, peaceful, and deeply satisfying skill that brings immediate warmth and comfort into your household. Once you get used to the basic rhythm of mixing, resting, and shaping, this recipe easily fits into your regular weekly routine without feeling like a stressful chore. You get to enjoy clean, delicious, and healthy bread made with honest ingredients that nourish your body and delight your taste buds. Gather your simple ingredients, feed your active sourdough starter, and enjoy the magical journey of creating beautiful homemade bread for the people you love most.
Nutrition Details
| Nutrient Name | Quantity Per Serving | Percentage Daily Value | | Calories | 160 kcal | 8 percent | | Total Fat | 3.5 grams | 5 percent | | Saturated Fat | 1.8 grams | 9 percent | | Cholesterol | 8 milligrams | 3 percent | | Sodium | 240 milligrams | 10 percent | | Total Carbohydrates | 27 grams | 10 percent | | Dietary Fiber | 1.2 grams | 4 percent | | Total Sugars | 2.5 grams | Not applicable | | Protein | 5 grams | 10 percent | | Calcium | 35 milligrams | 3 percent | | Iron | 1.5 milligrams | 8 percent | | Potassium | 65 milligrams | 2 percent |
The nutrition table values listed above are based on an estimated yield of sixteen equal slices per baked loaf. These numbers can vary slightly depending on the specific brands of flour, milk, butter, and natural sweetener you choose to use in your kitchen.
Disclaimer
Everyone’s body is completely different, and individual dietary needs, digestive reactions, and health results may change from person to person. While natural sourdough fermentation generally aids in breaking down gluten and starches, this specific recipe still contains real wheat flour and dairy ingredients, making it unsuitable for individuals diagnosed with celiac disease or severe lactose intolerance. The nutritional estimations provided in this article are meant for general educational purposes only and should not replace personalized medical advice from a qualified doctor or certified nutritionist. Always listen carefully to your own body and consult with a trusted healthcare professional regarding any specific dietary concerns or health conditions.