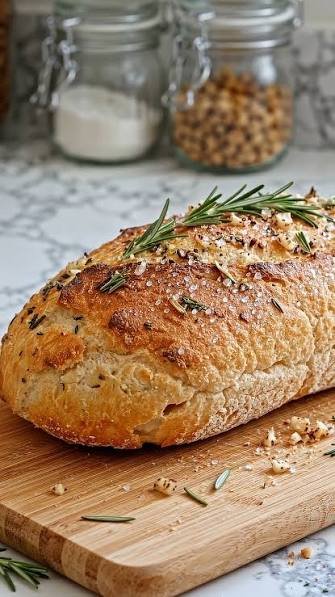
Rustic No Knead Rosemary Garlic Bread is a classic home baking recipe that brings the authentic smell and taste of a traditional bakery straight into your own kitchen. Many people think that baking fresh bread from scratch requires expert skills, hours of hard physical work, and special equipment that only professional bakers own. This simple recipe completely changes that idea by using a very slow and natural fermentation process instead of heavy physical labor. You do not need to spend any time stretching or pushing the dough on your kitchen counter because time does the heavy lifting for you. The combination of fragrant fresh rosemary leaves and rich roasted garlic creates an incredible flavor profile that makes your entire home smell comforting and warm. By relying on a simple mixing method and a hot baking dish, anyone can achieve a bakery quality loaf with a deep brown crunchy crust and a soft airy interior.
People absolutely love this bread because it offers maximum flavor and incredible texture with almost zero daily effort or specialized baking knowledge. The primary reason for its huge popularity among home cooks is the complete absence of kneading, which removes the most confusing and tiring part of traditional bread making. Beginners often worry about over working or under working their dough, but this method eliminates that stress entirely by letting moisture and time form the gluten structure naturally. Furthermore, the golden crust turns out super crispy and crackly every single time thanks to the steam trapped inside a hot baking pot during the first part of baking. The inside of the loaf stays unbelievably tender, fluffy, and full of large rustic air pockets that hold butter and oils perfectly. It is a foolproof recipe that yields professional results even for someone who has never touched dry yeast before in their whole life.
You should make this delicious loaf whenever you want to elevate a simple family dinner, impress guests at a gathering, or just enjoy a comforting slice of homemade food. Food brings deep emotional comfort, and the soothing process of mixing basic ingredients and waiting for them to transform creates a wonderful sense of peaceful satisfaction. The rich herbal notes of fresh rosemary combined with savory garlic make this loaf ideal for dipping into high quality olive oil, serving alongside hot winter soups, or pairing with fresh pasta dishes. From a health and balanced lifestyle perspective, making your own bread at home allows you to take complete control over every single ingredient entering your body. Commercial store bought breads are frequently loaded with artificial preservatives, excessive refined sugars, chemical dough conditioners, and unhealthy additives that keep them soft on store shelves for weeks. In stark contrast, this clean homemade recipe uses just pure simple ingredients that feed your body wholesome nourishment without hidden chemicals.
Baking this artisanal loaf also serves as a wonderful mindful activity that encourages you to slow down and connect with natural wholesome cooking. In our fast moving modern world full of screens and quick fast food, taking time to let dough rise naturally overnight teaches patience and rewards you with real food made by your own hands. Children and adults alike find great joy in watching a small bowl of wet flour and water expand into a lively bubbling mixture overnight. The magical moment when you lift the heavy lid off your hot baking pot to reveal a towering golden brown loaf creates a proud feeling of accomplishment that buying a packaged loaf from a supermarket can never match. Whether you are looking to save money on expensive bakery items, feed your family cleaner ingredients, or simply relax on a quiet weekend afternoon, this simple rosemary garlic loaf fits seamlessly into your daily routine.
Ingredients You Will Need
-
Unbleached all purpose flour: 4 cups
-
Warm water: 2 cups
-
Instant dry yeast: 1 half teaspoon
-
Fine sea salt: 2 teaspoons
-
Extra virgin olive oil: 2 tablespoons
-
Fresh rosemary leaves finely chopped: 2 tablespoons
-
Fresh garlic cloves minced very finely: 4 cloves
-
Garlic powder for extra deep flavor: 1 half teaspoon
Step by Step Method
First step is to prepare your aromatic herbs and garlic so they mix evenly into the flour. Take your fresh rosemary stems and strip the needle like leaves away from the hard woody stalks. Chop those green leaves very finely using a sharp kitchen knife until you have two full tablespoons of fresh chopped herbs. Next, peel four fresh garlic cloves and mince them into tiny uniform pieces so you do not bite into giant raw garlic chunks later. Set these prepared ingredients aside on a clean cutting board while you gather your dry baking items.
Second step is mixing all the dry ingredients together inside a large wide mixing bowl. Pour four cups of unbleached all purpose flour into your bowl along with two teaspoons of fine sea salt, one half teaspoon of instant dry yeast, and one half teaspoon of garlic powder. Use a hand whisk or a large spoon to stir these dry ingredients thoroughly for about one minute so the yeast and salt are completely distributed through the white flour. Even distribution ensures that your bread rises evenly without any salty spots or flat zones.
Third step is adding the wet ingredients along with your aromatic herbs to form the wet dough. Sprinkle your chopped fresh rosemary and minced fresh garlic directly over the mixed dry flour. Pour two tablespoons of extra virgin olive oil and two cups of warm water into the center of the bowl. Make sure your water feels comfortable to the touch, like warm bath water, because extremely hot water will kill your active yeast while cold water will delay the rising process significantly.
Fourth step is stirring everything together into a shaggy wet dough. Use a sturdy wooden spoon or a silicone spatula to mix the ingredients together until no dry white flour spots remain visible anywhere in the bowl. The resulting dough will look quite sticky, rough, and wet, which is entirely correct for a proper no knead bread recipe. Do not add extra flour even if the mixture looks too sticky to handle with your bare hands, because high moisture content is the secret key to creating a light open crumb texture inside the finished loaf.
Fifth step is allowing the long natural rest period where the gluten develops on its own. Cover your mixing bowl very tightly with plastic wrap or a secure fitted lid to prevent the surface of the dough from drying out into a hard skin. Place the bowl on your kitchen counter at warm room temperature and let it sit completely undisturbed for twelve to eighteen hours. During this extended time, the yeast slowly eats the natural sugars in the flour, releasing gas bubbles and developing deep sourdough like flavors without any manual physical kneading.
Sixth step is shaping your risen dough into a nice smooth round ball. After the long overnight rest, your dough should have doubled or tripled in size, showing lots of tiny active bubbles on top and smelling wonderfully rich and yeasty. Lightly dust your clean kitchen counter or a piece of parchment paper with a few spoonfuls of dry flour. Gently scrape the sticky dough out of the bowl onto the floured surface using a dough scraper or your hands. Gently fold the outer edges of the dough toward the center a few times to create a smooth outer skin on the bottom, then flip it over so the smooth top side faces upward in a nice round shape.
Seventh step is preparing for the hot baking phase by preheating your oven and baking pot properly. Place a heavy cast iron pot or Dutch oven with its tight lid inside your cold oven on the center rack. Turn your oven heat up to 450 degrees Fahrenheit and let both the oven and the heavy pot heat up together for at least thirty minutes. Getting the baking pot extremely hot before putting the wet dough inside is what creates that instant blast of steam necessary for a crispy thin crust.
Eighth step is scoring the loaf and moving it into the burning hot pot carefully. While your oven heats, let your shaped dough rest on a sheet of baking parchment paper, covered loosely with a clean kitchen towel for thirty minutes. Right before baking, use a very sharp knife to make a shallow swift slice across the top surface of the loaf. This slash allows steam to escape controlled during the initial bake so your loaf rises upward tall instead of bursting unexpectedly at the bottom sides.
Ninth step is baking the loaf inside the hot pot under high heat. Carefully pull the super hot pot out of the oven using thick heavy oven mitts and remove its hot lid. Grab the edges of the parchment paper supporting your shaped dough and gently lower both the paper and the dough straight into the bottom of the hot pot. Put the hot lid back onto the pot securely and slide it directly back into your hot oven. Bake with the tight lid on for thirty minutes to trap all natural steam escaping from the wet dough inside.
Tenth step is finishing the bake without the lid to achieve a deep golden brown color. After thirty minutes of steam baking, carefully open the oven door and remove the heavy lid from your pot using your oven mitts. You will immediately see that your bread has expanded dramatically and turned a pale cream color. Continue baking the bread without the lid for an additional fifteen to twenty minutes until the outer crust turns a deep golden chestnut brown and feels very hard when tapped gently with a wooden utensil.
Eleventh step is cooling the fresh loaf properly on a wire cooling rack. Remove the hot pot from the oven, then carefully lift the finished loaf out of the pot using the edges of the parchment paper. Place the hot loaf onto a wire cooling rack so air circulates freely under the bottom crust, preventing trapped steam from making the bottom soft or soggy. Let your freshly baked bread cool completely for at least one full hour before slicing into it with a serrated bread knife, as cutting hot bread too early makes the interior gummy and dense.
Why This Recipe Is Special
-
Requires zero physical kneading effort, making it ideal for absolute beginners, busy parents, or anyone with wrist discomfort.
-
Utilizes simple whole ingredients that are cheap, easy to find in any standard grocery store, and completely free of artificial additives.
-
Contains natural health benefits from real fresh garlic, which contains powerful natural antibacterial properties and immune supporting compounds.
-
Features fresh aromatic rosemary, an herb packed with natural antioxidant compounds that support digestion and healthy inflammation responses.
-
Delivers authentic bakery quality results featuring a super crispy crackly outer crust and a soft tender interior filled with beautiful rustic air pockets.
-
Saves money compared to buying expensive specialty loaves at fancy artisanal bakeries while providing far superior fresh flavor.
-
Fills your entire home with a incredibly comforting savory scent of toasted herbs and roasted garlic while it bakes in the hot oven.
Extra Tips for Better Taste
-
Roast your whole garlic cloves wrapped in foil with a drizzle of olive oil in the oven prior to making the dough for a sweeter and milder garlic flavor.
-
Mix one quarter cup of freshly grated parmesan cheese or sharp cheddar directly into the dry flour for an amazingly rich savory cheesy twist.
-
Brush the hot top crust with melted salted butter mixed with extra fresh chopped herbs immediately after taking the loaf out of the oven.
-
Substitute half of the water with a light flavor crisp white wine to add a subtle bright acidity and complex gourmet depth to the dough flavor.
-
Sprinkle coarse flakey sea salt over the top surface of the dough right after scoring it for a delightful salty crunch in every single bite.
-
Store leftovers wrapped loosely in a clean cotton tea towel or paper bag at room temperature rather than plastic bags to maintain crust crispness.
-
Toast sliced pieces in a hot skillet with a tiny drop of fresh olive oil to revive the crisp texture and unlock maximum herb flavor on day two or three.
Final Thoughts
Baking your own beautiful rustic loaf at home is one of the most rewarding and nourishing culinary habits you can ever build for yourself and your loved ones. This rustic no knead rosemary garlic bread proves beyond a doubt that you do not need decades of expert kitchen experience, expensive specialized machinery, or exhausting manual physical effort to create world class artisanal bread from scratch. With just a handful of basic pantry staples, a little bit of patience, and a hot baking dish, you can transform simple humble flour into a golden crispy masterpiece that brings incredible comfort to your dinner table. Give this simple recipe a try this coming weekend, embrace the beautiful slow process of natural baking, and enjoy the magical simple pleasure of tearing into a warm slice of fresh homemade bread cooked by your own hands.
Nutrition Details
| Nutritional Element | Measurement Per Serving | Daily Value Percentage |
| Serving Size | 1 slice equal to one twelfth of loaf | Not Applicable |
| Total Calories | 165 calories | 8 percent |
| Total Fat Content | 2 point 5 grams | 3 percent |
| Saturated Fat | 0 point 4 grams | 2 percent |
| Sodium Content | 390 milligrams | 17 percent |
| Total Carbohydrates | 31 grams | 11 percent |
| Dietary Fiber | 1 point 2 grams | 4 percent |
| Total Sugars | 0 point 3 grams | 0 percent |
| Protein Content | 4 point 5 grams | 9 percent |
| Calcium Amount | 12 milligrams | 1 percent |
| Iron Content | 1 point 8 milligrams | 10 percent |
| Potassium Amount | 55 milligrams | 1 percent |
Disclaimer
The nutritional values listed above are approximate estimates calculated based on standard average ingredient databases and a serving size of one slice from a loaf cut into twelve equal pieces. Individual actual nutritional values will naturally vary depending on specific ingredient brands used, minor variations in measurement accuracy, and individual portion sizes sliced at home. Everyone has a unique metabolic system, dynamic digestive health needs, and specific dietary requirements, meaning individual health responses to fresh baked foods will differ naturally from person to person. If you have active dietary restrictions, gluten sensitivities, medical conditions, or specific health goals, please consult with a qualified health professional or certified nutritionist to ensure this food fits your personal wellness plan.